Setting Up an AutoLISP Routine
Section 1: Setting Up an AutoLISP Routine
In this section you will learn how to:
- Divide a LISP routine into parts
- Prompt for user input
- Create an AutoLISP file using Visual LISP
Typical Structure of a Routine
AutoLISP routines can become very complicated. Like any complex problem, it helps to “divide and conquer” in order to understand the steps that will be necessary for the solution. Considering one part at a time will help you figure out what else you need in other parts. It also helps you make sure you have covered all the issues that may come up.
Although AutoLISP routines can have many different structures, a typical one might be divided into five general parts:
1. Prepare
2. Get user input
3. Perform Calculations
4. Execute AutoCAD functions
5. Clean up
We have already seen step 4, using the (command) function to execute AutoCAD commands. The next few sections will concentrate on how to get user input, prepare, and clean up. For most of the remainder of the class we will be discussing how to perform calculations.
Example

An AutoLISP routine designed to draw circular saw blades.
SAW.LSP
;;;Preparation
(defun DTR (deg) (* deg (/ pi 180)))
(defun c:SAW ()
(setq CE-SAV (getvar “cmdecho”))
(setvar “cmdecho” 0)
;;;Get User input
(setq CP (getpoint “\nCenter Point:”))
(setq ROUT (getreal “\nOuter Radius: “))
(setq RIN (getreal “\nInner Radius: “))
(setq NT (getint “\nNumber of teeth: “))
(setq HRAD (getreal “\nHole Radius: “))
(setq HUB (getreal “\nHub Thickness: “))
;;;Perform Calculations
(setq XCEN (car CP))
(setq YCEN (cadr CP))
(setq ANG1 (/ 360 NT))
(setq PT1 (list (+ XCEN ROUT) YCEN))
(setq PT2 (list (+ XCEN RIN) YCEN))
(setq PT3 (polar CP (dtr ANG1) ROUT))
;;;Execute AutoCAD functions
(command “circle” CP HRAD)
(command “circle” CP (+ HRAD HUB))
(command “pline” PT1 PT2 PT3 “”)
(command “array” “l” “” “p” CP NT “” “”)
;;;Clean up
(redraw)
(setvar “cmdecho” CE-SAV)
(princ)
)
- A complete solution to this exercise is on your class disk as SAW.LSP.
Prompting for User Input
In a previous module we learned the function (getvar). This function “got” a system variable stored in AutoCAD. Frequently when writing an AutoLISP routine, you’ll want the user to provide information: the name of a layer, the endpoint of a line, the angle of rotation, the number of rows, etc. AutoLISP provides a means of requesting user input through the (getxxx) functions.
Explanation: the (getxxx) functions
(getint [prompt] )
This function pauses for integer input and returns an integer value. The [prompt] here and throughout is optional, though recommended, information for the user. The prompt must be in string form.
Command:(getint “Enter an integer: ”)1
1
(getreal [prompt] )
This function pauses for real input and returns a real value.
Command:(getreal “Enter a real number: ”)1.25
1.25
(getstring [ T ] [prompt] )
This function pauses for string input and returns a string value.
The optional T disables the spacebar for use as the <enter> key, allowing use of spaces in a string. The T, which always has a value of T or non-nil, is most commonly used as the flag, but anything that has value can be used, such as a number.
- Use the T option with (getstring) when the user will type in multiple words or numbers.
- Do not use the T option when the user expects the spacebar to act as <enter>, or when spaces are invalid (as when prompting for a layer name in previous versions of AutoCAD).
Command: (getstring “What is your first name: ”)
What is your first name: Albert
“Albert”
Command: (getstring T “What is your full name: ”)
What is your full name: Albert Einstein
“Albert Einstein”
(getpoint [point-list] [prompt] )
This function pauses for point input and returns a point list of (x y z). The optional point-list is used as a basepoint for the “drag” line.
Command: (setq A (getpoint “Pick a point: ”))
Pick a point: <pick a point>
(1.0 2.3 0.0) actual returned value may vary
Command: (getpoint A “Pick another point: ”)
Pick another point: <pick a point – a drag line
will show from the first point you picked.> (2.4 5.7 0.0) actual returned value may vary
(getcorner point-list [prompt] )
This function pauses for point input and returns a point list of (x y z). The point-list is not optional this time. It is used as basepoint for a “drag” rectangle similar to a zoom window.
Command: (setq A (getpoint “First corner: “))
First corner: <pick a point>
(3.60591 7.25652 0.0) actual returned value may vary
Command: (getcorner A “Opposite corner: “)
Opposite corner: <pick a point>
(12.2542 11.1953 0.0) actual returned value may vary
(getdist [point-list] [prompt] )
This function pauses for real input and returns a real value. The user can enter a decimal number, or a number based on the current linear unit measurement setting, or can pick two points and the distance between those points will be returned. The optional [point-list] is used as basepoint for “drag” line requiring user to only enter the second point.
- All inputs for points are available: pick, type in absolute or relative coordinates, use an object snap, point filter, or tracking.
(getdist “Type in a distance or pick two points: “) Type in a distance or pick two points: <pick point> Specify second point: <pick point>
9.125 actual returned value may vary
(getangle [point-list] [prompt] )
This function returns a real number in radians of an angle entered either by pointing or by typing a value. The optional [point-list] lets you include a point (usually a symbol that points back to information that gives you a point) that defines the first point of the angle.
- Angles in AutoLISP are measured in radians. As long as AutoLISP is using the information this is no problem. But when the angle needs to be presented to the user the radians must be reinterpreted in degrees. Later we will show you two programs (DegreesToRadians) and (RadiansToDegrees) that will do the translating for you.
- If you have changed the angle base or direction from the default (0 is the positive X-axis and counter-clockwise) then you might need to use the (getorient) function.
Command: (getangle “Type in an angle: “)
Type in an angle: 135
2.35619 135 degrees in radians
Command: (setq PT1 (getpoint “Pick 1st point of angle: “))
Pick 1st point of angle: <pick a point>
(512.265 309.661 0.0) actual returned value may vary Command: (getangle PT1 “Pick 2nd point of angle: “)
Pick 2nd point of angle: <pick a point>
0.60734 angle in radians – actual returned value mayvary
Notes
- Note that the choice of which (getxxx) function to use depends on the data type of the desired response. Only the appropriate data type will be accepted as input. If you enter the wrong type of data, AutoLISP will automatically ask you to try again.
Command: (getint “Type a number: “)
Type a number:1.25
Requires an integer value.
Type a number:3
3
- Always nest one of these (getxxx) functions inside a (setq) so that you can recall the information later.
(setq NUMROW (getint “How many rows: ”))
Writing Prompts
- Write prompts so that the user will know exactly what you expect.
(getint “How many rows: ”) - Always capitalize the first character of the prompt and use a colon and a space to finish up the string. This makes it look like other AutoCAD prompts. Don’t capitalize all of it because it looks like you are YELLING.
PRACTICE
Type in the following functions. Estimated time for completion: 5 minutes.
1. At the Command: prompt type in:
(setq NAME (getstring “Enter your name:”))
2. At the prompt, try to type your full name. What happens?
3. At the Command line type in:
(setq NAME (getstring T “Enter your name:”))
4. Now type in your full name.
5. At the Command: prompt, type the following and pick points or give numbers as prompted:
(setq PT1 (getpoint “Enter a point: ”))
(setq PT2 (getpoint “Enter a point: ”))
(setq R1 (getreal “Enter a number: ”))
Creating an AutoLISP File
You will want to use an AutoLISP routine over and over again and not have to type it in at the Command line every time. An AutoLISP routine can be created in any text editor or word processor, and then saved as a file in ASCII text format.
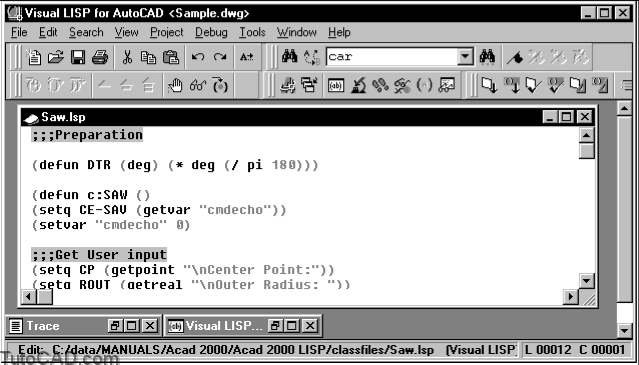
AutoCAD itself includes a powerful text editor and debugger called Visual LISP. We will use Visual LISP as our text editor and later learn some of its debugging features.
- To open the Visual LISP editor, choose Tools>AutoLISP>Visual LISP Editor from the pulldown, or type VLIDE at the Command line.
- All AutoLISP files must have the .LSP file extension. Visual LISP saves to this extension by default.
- There is no word-wrapping in Visual LISP.
- You can have multiple AutoLISP files loaded at once.
- Visual LISP has an automatic backup feature on by default that saves a file to filename._sp. It is controlled under Tools>Environment Options> General Options.
Color Coding in the Visual LISP Editor
One thing you will notice as soon as you load a file into the Visual LISP editor is the color coding. This helps to identify each type of data in a routine.
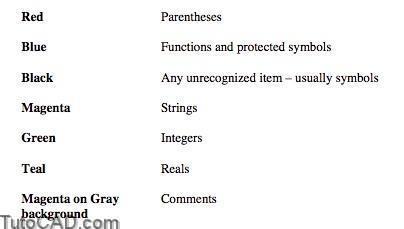
- You can change the colors in the Visual LISP editor under Tools>Window Attributes> Configure Current.
PRACTICE
In this practice you will open an existing AutoLISP file and identify the different parts. Then, you will create an AutoLISP file that will ask for four unique points and will then construct a closed, four-sided polygon by drawing a line between each point. Estimated time for completion: 10 minutes.
1. Start the Visual LISP Editor and open the file SAW.LSP.
2. List the Symbols used in this file:
3. List the Functions used in this file:
4. Start a new file in the Visual LISP editor and save it to the name BOX1.LSP. Using the (setq), (getpoint), and (command) functions, write up a routine that will request user input of four points and construct a line through each point to create a polygon.
- A complete solution to this exercise is on your class disk as BOX1-A.LSP and on the next page.
Solution
(setq PT1 (getpoint “Lower left corner: ”))
(setq PT2 (getpoint “Lower right corner: ”))
(setq PT3 (getpoint “Upper right corner: ”))
(setq PT4 (getpoint “Upper left corner: ”))
(command “line” PT1 PT2 PT3 PT4 “close”)
Self Check:
Setting up an AutoLISP Routine
1. What are the five parts of a typical AutoLISP routine?
2. What function will allow the user to input a real value by picking two points?
3. What function will draw a dynamic “window” attached to the pointer?
4. What is the purpose of the optional basepoint in the (getpoint) function?