Using Additional Point List Functions with autolisp in AutoCAD
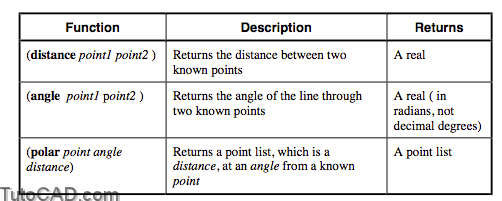
In the previous module we learned two AutoLISP functions that asked for user input and returned a point list: (getpoint) and (getcorner). You can also use (list), (quote), and a new function, (polar), to return a point list. Use these point lists with an AutoCAD command to place objects or to generate other lists. Two other functions also use points to give us information: (distance) and (angle).
- Angles in AutoLISP are always measured in radians relative to the X-axis in counter-clockwise direction. You can use the routines we created earlier, DegreesToRadians and RadiansToDegrees, if you need a translation.
- The (polar) function uses the same three pieces of information as polar coordinates (start point, distance, angle) but in a different order (start point, angle, distance). You can use any start point, not just the last point picked.
PRACTICE

Use the functions listed on previous page to draw a balloon-type tag. First, get input of two points, one for the endpoint of the leader, the second for the center of the circle. Then determine the angle and the distance between the points. Use a quarter of the value of the AutoCAD variable DIMSCALE as the radius of the circle so they always plot out at 1/4” diameter. Find the other endpoint of the leader by going the same distance as the radius at the same angle as the leader endpoint to the center point, from the center point by using (polar). Then draw the circle and the line. Estimated time for completion: 10 minutes.
Solution
(defun c:TAG ()
(setq CE-SAV (getvar “cmdecho”))
(setvar “cmdecho” 0)
(setq OS-SAVE (getvar “osnapcoord”))
(setvar “osnapcoord” 1)
(setq PT1 (getpoint “\nPick the leader endpoint:”))
(setq PT2 (getpoint PT1 “\nPick the tag center point:”))
(setq RADIUS (/ (getvar “dimscale”) 4.0))
(setq ANGLE1 (angle PT2 PT1))
(setq LEADERENDPT (polar PT2 ANGLE1 RADIUS))
(command “line” PT1 LEADERENDPT “”)
(command “circle” PT2 RADIUS)
(setvar “cmdecho” CE-SAV)
(setvar “osnapcoord” OS-SAVE)
(redraw)
(princ)
)
- A complete solution is on your class disk as TAG-A.LSP.
- This function will not work if you have the DIMSCALE set to “Scale dimensions to Layout (paperspace)” because the variable is 0.
The OSNAPCOORD system variable controls the priority for keyboard entry verses object snaps. Set this variable to 1 for AutoLISP routines so that the osnaps will not take precedence over the point you assign through AutoLISP.