Controlling Attribute Visibility
Specify the normal visibility for attributes when you define them.
- if you do not want an attribute to be displayed in block inserts you should check Invisible as the Mode.

You can override the visibility of all attributes in block inserts (but not the Invisibility mode of individual attributes) using Attdisp.
- if you select Normal the only attributes displayed in all block inserts are those defined with the Invisible mode unchecked.
- if you select On you see all attributes in all block inserts even if they were defined with the Invisible mode checked.
- if you select Off you will not see any attributes in block inserts even if they were defined with the Invisible mode unchecked.
PRACTICE CONTROLLING ATTRIBUTE VISIBILITY
» 1) Close the drawing from the previous exercise.
» 2) Open the T207_4.dwg drawing in your personal folder.

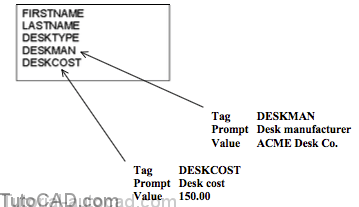
3) Pick Draw + Block + Define Attributes. Use FIRSTNAME as the Tag, First name as the Prompt & Empty as the Value. Type 2.4 as the Height. Pick Pick Point & use an Endpoint shown below. Then pick OK.

4) Pick Modify + Move and type L to select the Last object. Press <enter> then type 2,– 4 as the displacement and press <enter> at the prompt for a second point of displacement.

5) Pick Draw + Block + Define Attributes. Then check the Align below previous attribute definition. Enter LASTNAME as the Tag, Last name as the Prompt and Vacant as the Value. Then pick OK.

If there is more than one attribute defined in a drawing you can automatically align the next attribute below your last attribute.
- this attribute also uses the same text properties as the last attribute as well.
- the spacing is the same as if you had used the Dtext command to create multiple lines of TEXT objects.
6) Right-click in the drawing area to invoke a shortcut and select Repeat Define Attributes. Then check Align below previous attribute definition again and check Invisible. Enter DESKTYPE as the Tag, Desk type as the Prompt and Standard as the Value. Then pick OK.

7) Use a similar technique to create the final two attribute definitions shown below (both should be Invisible).
In the next step you will use Block to create a new DESK block definition using these attributes (and the rectangle).
- when you define the block, select the ATTRIBUTE DEFINITIONs in same sequence that you created the attributes.
- the selection sequence determines the sequence in which you supply values when you Insert the blocks later on.
8)Pick Draw + Block + Make. Type DESK as the Name and pick the Pick point button. Use the Endpoint osnap shown below as the Base point. Then pick the Select objects button. Select the rectangle then the attributes (one at a time in the same order you created them). Press <enter> to return and enter Desk with attributes as the Description. Pick OK to create the new block definition.

9) Make Furniture the current layer.
![]()
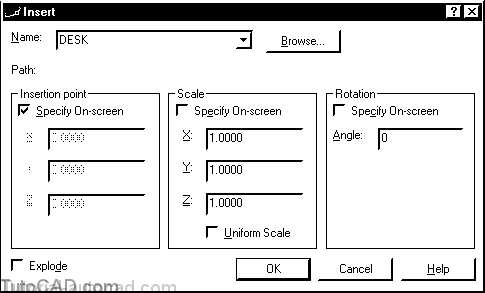
10) Pick Insert + Block. Select DESK as the Name and make sure the only Specify On-screen box checked is for Insertion point. Then pick OK to continue.
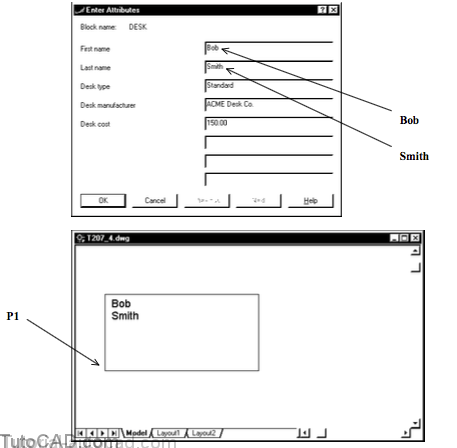
11) Pick near P1 as the insertion point. Then change the First name to Bob and the Last name to Smith and pick OK to use the defaults for the other attributes.
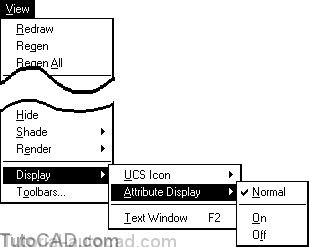
12) Pick View + Display + Attribute Display + On and note that even the Invisible attributes are now displayed.

13) Pick View + Display + Attribute Display + Off and note how all attributes disappear.
14) Pick View + Display + Attribute Display + Normal and the Invisible attributes are the only ones that do not display.

15) Pick View + Zoom + Extents so you can see where your DESK block is relative to the floor plan.

16) Pick Modify + Array. Enter L to select the Last object then press <enter> to continue. Press <enter> to use the <R> type. Enter 2 as the number of rows and 4 as the number of columns. Then use Midpoint osnaps on the right side of wall LINEs near P1 then P2 to specify the distance between rows and columns.
Command: ARRAY↵
Select objects: L↵
Select objects: ↵
Enter the type of array [Rectangular/Polar] <R>: ↵
Enter the number of rows (—) <1>: 2 ↵
Enter the number of columns (|||) <1> 4 ↵
Enter the distance between rows or specify unit cell (—): (pick P1 with Midpoint osnap)
Specify opposite corner: (pick P2 with Midpoint osnap)
Command:

You just created the same block insert (with the same attribute values) in the same location of each office.
- in the next step you will edit the attribute values in the other inserts to track the people and desks in each office.
17) Pick Modify + Attribute + Single. Select the block in room 2 and change the attribute values to match those in the table below then pick OK. Repeat for the other rooms.

It is faster to copy these 8 blocks with attributes then edit them to have the desired attribute values
- compared to the time it would take to use Insert 8 times.
» 18) Save the changes to this drawing to prepare for the next exercise.