How to use Drag & Drop Cut & Paste
How to use Drag & Drop Cut & Paste
In AutoCAD it is easy to re-use objects in other drawings.
- One approach is to drag & drop object copies from one (open) drawing file into another (open) drawing file.
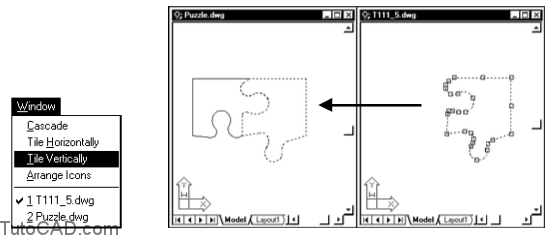
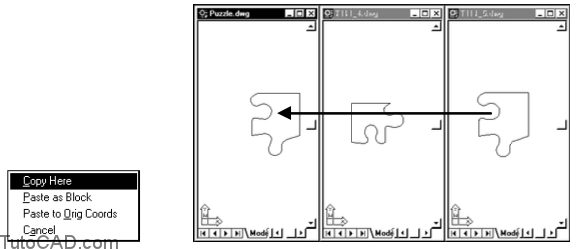
- Tile drawings in their own individual windows so you can see both drawings of interest at the same time.
- select source objects when no command is running.
- press & hold your right mouse button and drag the selected objects to the window of the desired destination file.
- select an option from the shortcut when you drop the objects.
- Copy Here pastes individual objects at an approximate location (by eye) when you release the mouse button.
- Paste as Block pastes a single block insert with an arbitrary name (you can use Rename to change this name later on).
- Paste to Orig Coords pastes individual objects in the same location as they were in the source drawing file.
When you drag & drop objects into other drawings you have limited control over where the copied objects are inserted.
- the only precise option is Paste to Orig Coords but this is not always where you want to paste the copied objects.
Drag & Drop (drawings)
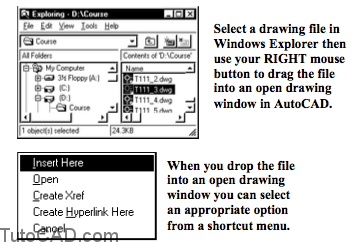
The most practical use of drag & drop in AutoCAD is when you involve the Windows Explorer.
– for example, you can drag a drawing file (or files) from Explorer into AutoCAD to Open the selected drawing(s).
Use your right mouse button to drag drawing files for maximum control over the end results (a shortcut menu normally appears).
– for example, you can select Insert Here or Open when you Drop a drawing file into an open drawing window.
Your options will depend on where you drop drawing files, which mouse button you use and the number of selected files.
– use your right mouse button to be safe.

You can drag & drop other files into AutoCAD, such as text (*.txt) documents, AutoLISP programs, raster images, etc..
Cut & Paste Process
Cut & paste also lets you insert copied objects into other drawings but you can be more precise if this is required.
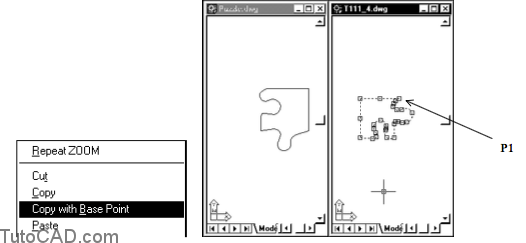
- -select the source objects when no command is running.
- -right-click in the drawing area to invoke a shortcut then select an option for copying.

- press <Esc> twice to clear the grips of selected objects.
- make the destination drawing the active drawing.
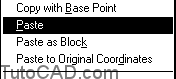
- right-click in the drawing area to invoke a shortcut then select an option for pasting.


Cut/Copy Options
- Cut removes the selected objects from the source drawing and places a copy of these objects in the Windows clipboard.
- Copy leaves the selected objects from the source drawing intact and places a copy of these objects in the Windows clipboard.
- Copy with Base Point is the same as Copy except you are prompted to select the precise base point used for insertion.
Paste Options
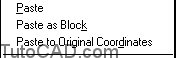
- Paste inserts copies of the selected object in the destination drawing but the insertion point is not precise.
- Paste as Block is similar to Paste but the objects are inserted as a block insert with an arbitrary name (you can Rename it later).
- Paste to Original Coordinates pastes individual objects in the destination file at the same coordinates as the source drawing.
- You can Paste as Block in the same (source) drawing file to create a new block definition (and a block insert) in that file.
- – this may be faster than using the Bmake command to define a new block but you will probably want to Rename this block.
practice: Drag & Drop and Cut & Paste techniques
- Close all open drawings (if there are any drawings open).
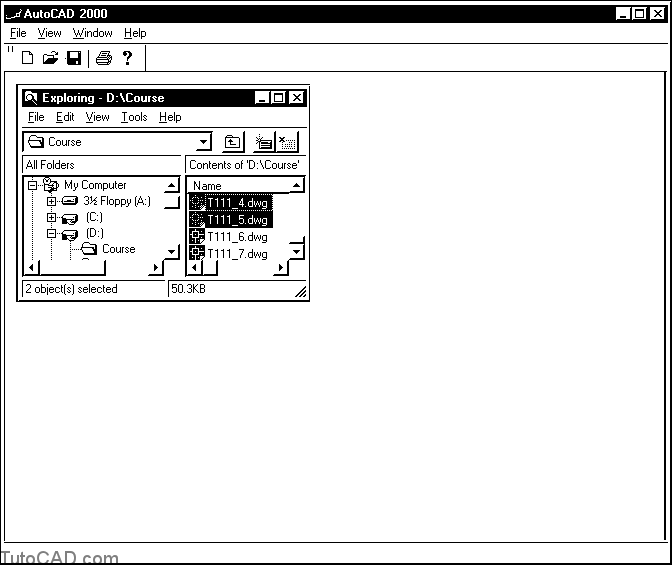
- Invoke Windows Explorer. Adjust the size & shape of this window so you can see both Explorer & AutoCAD on-screen.
- Navigate in Explorer to your personal folder. Press & hold the <Ctrl> key while you select T111_4.dwg & T111_5.dwg. Drag these files (left or right mouse button in this case is the same) into the empty space inside the AutoCAD window to Open both of these drawings.
You will only get a shortcut with the right mouse button when you drop the files into a drawing window.
– if you use your left mouse button to drag you will NEVER get a shortcut even if you drop drawings in another drawing window.
- Pick File + New. Select Start from Scratch and pick OK with English as the Default settings.
- Pick File + Save to save this drawing as Puzzle.dwg in your personal folder.
- Pick Window + Tile Vertically to display all three drawings in separate windows.
- Left-click in the middle window to make this the active drawing.
- Pick View + Zoom + Extents. Then pick View + Zoom + Out to add a margin of empty space around the objects displayed in this drawing window.
- Left-click in the drawing window on the right side to make this the active drawing then repeat the previous step. Your windows inside AutoCAD should resemble the illustration shown below.

10- Make sure T111_5.dwg is the active drawing (left-click in this drawing window if it is not).
11- With no command running, left-click near P1 when your pickbox is not above any object then pick near P2 to use an implied Window shown to select all objects on-screen.

12- Press & hold your right mouse button at any point in the T111_5.dwg drawing window & drag the copied objects into the (empty) Puzzle.dwg window. When you release the mouse button select Copy Here from the shortcut.
143- Left-click on the small x in the upper right corner of the T111_5.dwg drawing window to Close this file. Discard any changes to this file.
14- Left-click in the T111_4.dwg drawing window to make this the active drawing. Then select the objects on-screen again using another implied Window. Right-click in this window to invoke a shortcut & select Copy with Base Point. Then click on the grip point at the end of the horizontal LINE near P1 below to use this as the base point.
15- Press <Esc> twice to clear the grips.
16- Left-click on the small x in the upper right corner of the T111_4.dwg drawing window to Close this file without saving any changes to it.
17- Right-click in the Puzzle.dwg drawing window to invoke a shortcut and select Paste.
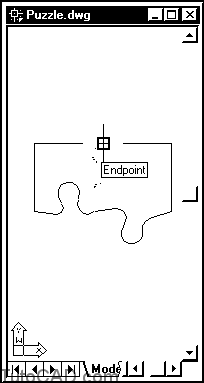
18- Invoke an Endpoint osnap shown below and left-click to use that point as the insertion point.
More practice?
19- Open T111_6.dwg & T111_7.dwg in your personal folder. Arrange these drawing windows so they resemble the illustration below. Use a similar technique to Copy with Base Point and Paste into Puzzle.dwg to solve this puzzle.

20- Save the changes to Puzzle.dwg then Close all files without saving changes made to the other files.