Halting the Program with autolisp in AutoCAD
![]()
To use most of the other debugging tools, you need to stop the program in the middle of the process and then walk through it step by step. To do this, put a breakpoint in front of the parenthesis where you want to start. Then you can use the step buttons to proceed as needed. You can add as many breakpoints as you want in a routine.
Toggle Breakpoint
The Toggle Breakpoint command places a “stop” in your program or turns the breakpoint off if there was one. When you run the program it will stop at the breakpoint, return to the VLISP editor, and highlight the next expression.
- Breakpoints are displayed as a red rectangle around a white parenthesis.
- The breakpoint must be at a parenthesis. If it is not, it will jump to the next one and ask if you want to “Set breakpoint here?”
- After you set breakpoints, load the code using the Load active edit window button (or Load selection for just part of the routine).

Notes
- You can also toggle a breakpoint by right-clicking and choosing Toggle Breakpoint on the cursor menu.
- You can disable a breakpoint by picking in front of or behind it and right-clicking. The top choice of the menu will be Breakpoint Service. Choose this and select the Disable button. The breakpoint symbol will change to a blue background. The breakpoint will be ignored until you enable it again through the same process.
- You may view all breakpoints in all open files under View> Breakpoints Window.
Stepping Through the Code
When you have reached a breakpoint you can step through the rest of the program by using the Step Into, Step Over, and Step Out functions.
Step Into
![]()
Step Into takes you to the starting parenthesis of the innermost nested expression at the breakpoint. For example, if you set the breakpoint at the expression below, the cursor would move to the beginning of (getpoint “\nSelect a point: “).
(setq POINT (getpoint “\nSelect a point: “))
If you pick Step Into again it would jump to the end of the nested expression and then out to the end of the entire phrase. After that it would go to the first parenthesis of the next expression in the routine.
- You can tell if you are at the beginning or ending parenthesis by looking at the Step Indicator button.
- The shortcut key-in for Step Into is F8.
Step Over
![]()
Step Over evaluates the entire expression including all its interior nested expressions and then stops at the end of the expression. Press the button again to evaluate the next expression.
- The shortcut key-in for Step Over is <Shift>+ F8.
Step Out
![]()
Step Out evaluates all functions contained in the current function. The shortcut key-in for Step Out is <Ctrl> + <Shift> + F8
Continue, Quit, Reset
You can also use tools that will ignore or evaluate the expressions and move to the next breakpoint or out of the program.

Protected Variables
If you use a protected variable such as ANGLE, DISTANCE or T as a symbol name, Visual LISP will automatically stop the program and show an alert dialog box.
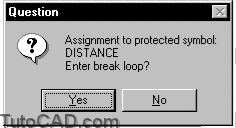
Enter the break loop and press the Reset button to cancel out of the program. Then go into your file and change the symbol name. Reload the program and try it again.
PRACTICE : STEPPING THROUGH A PROGRAM
In this practice you will set a breakpoint in the program and then run it. Once it stops you will step through the rest of the program. Estimated time for completion: 5 minutes.
1. Continue using the file SAW.LSP.
2. Set a breakpoint in front of the line:
(setq XCEN (car CP))
3. Use the Load active edit window button to load the file, and start the routine by typing SAW at the AutoCAD command prompt.
4. When you have finished typing in the variables, the process will switch back to the Visual LISP editor.
5. Press Step Into 3 times. Notice the position of the cursor in the Step Indicator button.
6. Press Step Over several times.
7. Press Step Out twice to finish the process.
Optional:
1. Start a new LISP file.
2. Type in the following code:
(setq DISTANCE (getdist “\nPick two points: “))
3. Highlight the code and press the Load Selection button.
4. Select the two points as directed at the command line.
5. When the Question box comes up choose to enter the break loop and then press the Reset button.
6. Change the symbol name to DISTANCE1 and try it again.
7. What other clue did Visual LISP give you that DISTANCE should not be used as a symbol name?