Object Linking & Embedding – OLE
Object Linking & Embedding (OLE) is the process in which data from a source file is linked to or embedded in a destination file.
- you use the Windows clipboard to copy this data from a source document & then paste it into the destination document.
When you double-click on linked or embedded data you can edit that data using the Windows application that made the source file.
- if this data is embedded the original source file is no longer required by the destination document.
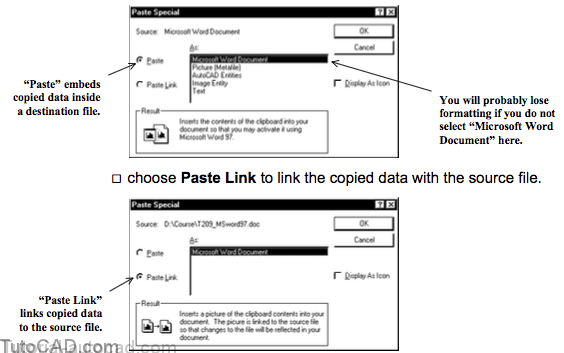
- if data is linked the current data is updated from the original source file (if it is available) when you open the destination file.
- an AutoCAD file can be either a source document or the destination document for the copied data.
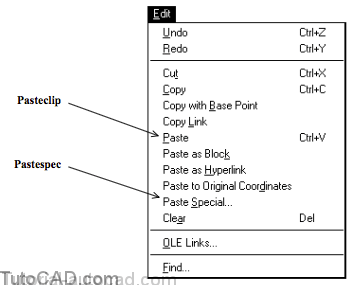
There are 3 commands to copy AutoCAD objects to the clipboard.
- Cutclip copies selected objects to the Windows clipboard and then Erases these objects in AutoCAD.
- Copyclip copies selected objects to the Windows clipboard and leaves the original objects as they were in AutoCAD.
- Copylink copies all objects in view on the current layout and is the only way to capture objects displayed in multiple viewports.

Pasting data into AutoCAD files
Your options for pasting data into AutoCAD will depend somewhat on the type of copied data and the source file application.
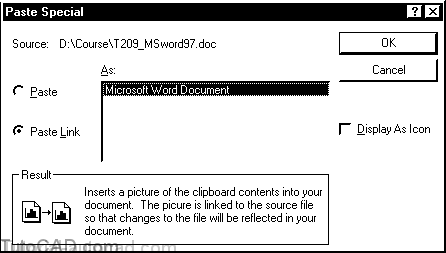
- you can use Pasteclip but you will have more control over how the copied data is pasted if you use Pastespec.
For example, if you paste a copied table from a Word file you would have the following options when you use Pastespec in AutoCAD.
- choose Paste & pick Microsoft Word Document if you want to edit the data in Word later on (no link to the actual source file).
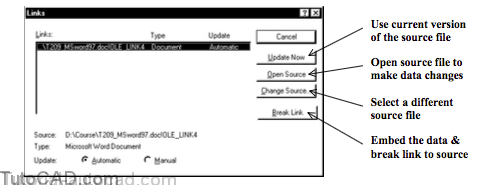
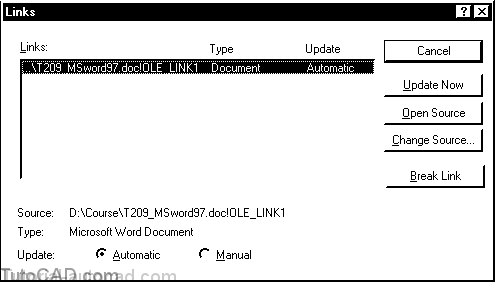
You can manage linked data in your AutoCAD drawings using the Olelinks command in AutoCAD.
- Select the desired source (link) file then change the desired settings.
- links are configured for an Automatic Update by default so data in drawings is automatically updated if the source file changes.
- you can select Manual as the Update type to let you control when (or if) the current source file is used to update the drawing.
- if the source file is unavailable when you open a destination file AutoCAD uses the last available data for both Update settings.
Boundary Box (frame size)
OLE Properties
You can left-click inside linked or embedded data in AutoCAD to select the boundary box then right-click in it to invoke a shortcut.
- pick Properties in the shortcut to invoke the OLE Properties box (you may also see this box when you paste OLE objects).
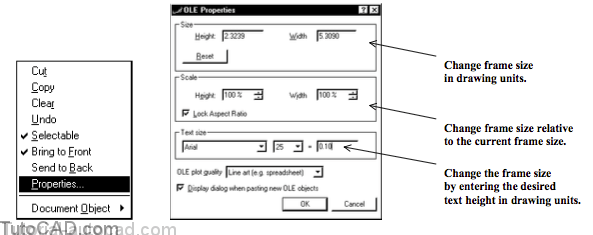
You may have to experiment with the OLE plot quality for various different data types to find a setting for the best plot results.
- for example, if you paste a table from Word into AutoCAD you might want to use Line art (e.g. spreadsheet) for better results.
There are many other shortcut options when you right-click inside a selected OLE boundary box.
PRACTICE LINKING A WORD TABLE IN AN AUTOCAD FILE
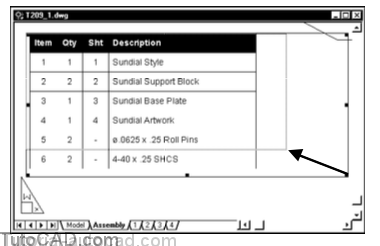
1) Continue with the T209_1.dwg AutoCAD file from the previous exercise (or Open this drawing in your personal folder). Assembly should be the current layout.

2) Open the T209_MSword97.doc file in your personal folder using MS Word 97.
3) Left-click in the table then pick Table + Select Table. Then pick Edit + Copy to copy the table to the windows clipboard.

4) Switch to the AutoCAD but leave Word running and the document open in Word.
![]()
5) Pick Edit + Paste Special and choose Paste Link. Then pick OK to create a link to the source file.
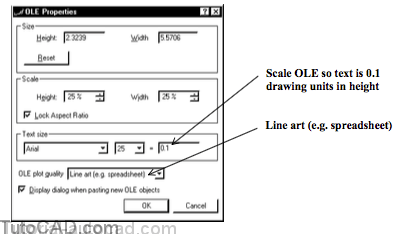
6) Right-click in the boundary box for the new OLE object to invoke a shortcut and select Properites. Type 0.1 as the text size and select Line art (e.g. spreadsheet) as the OLE plot quality and pick OK to complete the changes. (Note that the values for Size & Scale of the boundary box on your system will probably not match the illustration below.)
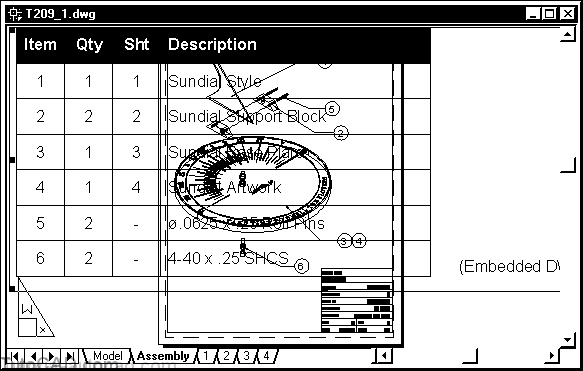
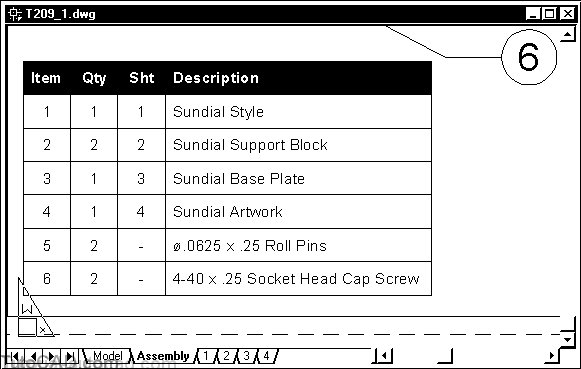
7) Left-click inside the newly scaled OLE object and drag it into position approximately as shown below.
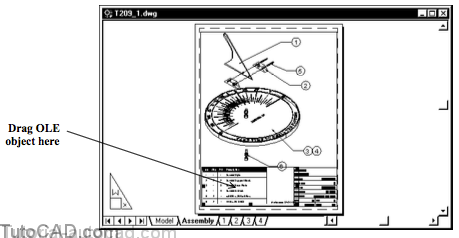
8) Zoom In to this area to see an enlarged view of the new OLE object. Drag it to a better position on the sheet if the table lies outside the title block border.
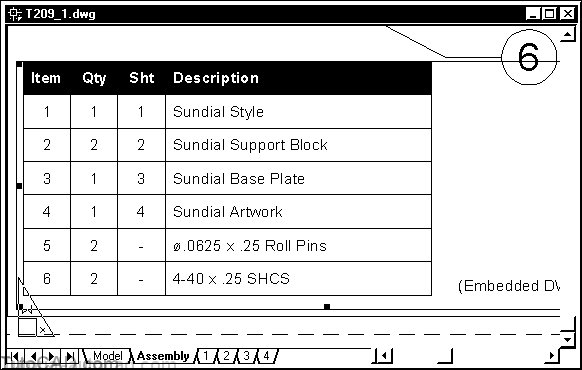
You will probably see part of the text (Embedded DWF file) but the DWF object itself may not be visible.
- this text was inside a text box beside the table you selected and the text box was included with the table data.
- you will delete this when you return to edit the source file in the next few steps.
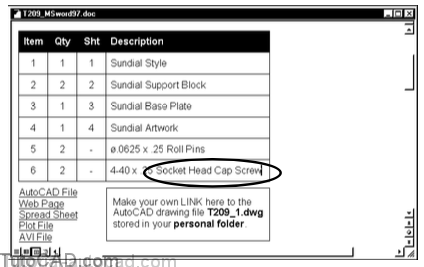
9) Double-click on the OLE object to return to the source document inside Word.
10) Left-click once in the embedded DWF object and pick Edit + Select All then pick the Delete key to erase these objects.

11) Replace the SHCS abbreviation in the table with the corresponding Socket Head Cap Screw then pick File + Save to save these changes to this source file and Close the document. Then Close Word.
» 12)) Return to AutoCAD (if explicitly required) to see these changes updated automatically.
» 13 Press <Esc> to deselect the OLE object.
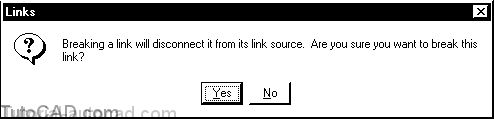
14) Pick Edit + OLE Links. Select the only link in the drawing then pick Break Link. Pick Yes when warned about the consequences then pick Close to complete the command.
Now the data is embedded in the AutoCAD drawing as a Picture (metafile) object so you cannot change it using Word
- and there is no longer a link to the original word file so you could not update changes to the source file in this drawing.
15) Save the changes to T209_1.dwg and Close the file.