How to use Object Snaps
Here how to use object snaps in AutoCAD
An object snap override is ONLY valid for the next point you pick.
- it is more efficient to use running osnaps (instead of overrides) to use the same osnap mode(s) for several points.
- for example, you could have set a running osnap for Endpoint to complete the previous exercise with less effort in less time.You can select the desired osnap mode to set as a running osnap by using the Dsettings command.
- check the desired mode in the Object Snap tab.
- you can set more than one mode at the same time.
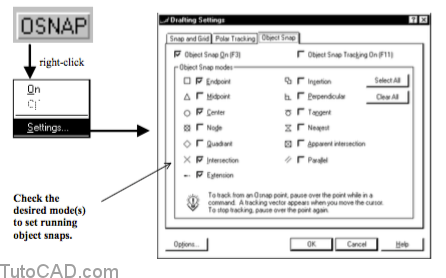
The marker for each osnap mode is displayed on the Object Snap tab of Dsettings
- for example, markers for Endpoint osnaps are a simple box.
- you should learn to recognize object snap markers for the osnap modes you plan to use.
AutoCAD will use the approximate point you pick if no match is found for your running osnaps (e.g. if you do not click near an object)
- you are not warned and you may not even be aware when AutoCAD does not utilize running osnaps for supplied points.
- if no match is found for an osnap override, AutoCAD will report this error on the command line.
No [osnap override mode used] found for specified point. Invalid point.
- you would have to explicitly invoke the same osnap override again and click on an object to use the desired osnap point.
- this safety feature for osnap overrides does not exist for running osnaps.
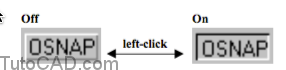
- You can toggle running osnaps On or Off at any time by left-clicking on the OSNAP button in the status bar
- or press the F3 function key to toggle OSNAP or check/uncheck Object Snap On on the Object Snap tab of Dsettings.
when you toggle OSNAP Off your running osnap settings are retained so they can be easily restored when you need them.
If you right-click on the OSNAP button in the status bar you will invoke a shortcut menu.
- you can select On or Off as an alternative to left-clicking on the OSNAP button
- or you can pick Settings as an alternative to explicitly invoking the Dsettings command.
- left-click on OSNAP when no running osnaps are selected and the Dsettings command is invoked automatically.

When OSNAP is On and AutoCAD is prompting for a point you can hold your crosshairs over an object to invoke a running osnap.
- when there are several running osnaps set you can press the <tab> key to cycle between modes that are currently set.
- when the desired osnap marker and tooltip appear you can left-click to use that osnap point.
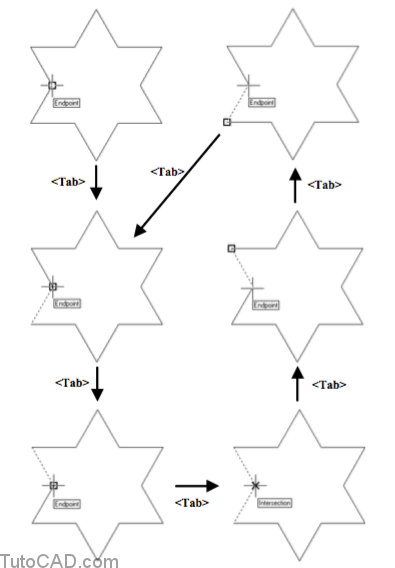
Set only a few of the running osnap modes that you plan to use most of the time so you can cycle quickly through these modes.
Practice using running osnaps
- You can continue with the drawing from the previous exercise and enter U to Undo the last Line command. (if you did not complete the last exercise you can Open T104_1.dwg in your personal folder). Your drawing should look like the illustration below before you continue.
2- Pick Draw + Line to begin the Line command then examine your status bar and make sure the OSNAP button is Off (if it does not look popped out then left-click on it to toggle it Off).
3- Right-click on the OSNAP button on the status bar to invoke a shortcut and pick Settings to continue.

4- Verify that your running osnaps are set as shown & pick OK.

These running osnaps were set in the T104.scr script that you ran in an earlier exercise on page 5.
- these are also the default initial settings when you first install AutoCAD but they are stored in the registry.
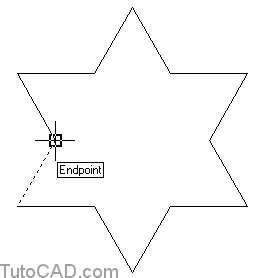
- if you make changes to these settings the changes will be retained in other drawing sessions.5- Hold your crosshairs over the end of the LINE near P1 below and wait for the osnap marker and tooltip to appear. Do NOT press your mouse button yet.
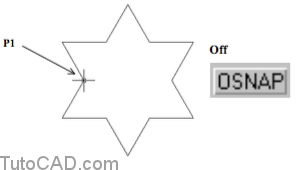
The OSNAP status bar button is Off right now so the running osnaps will not be in effect.
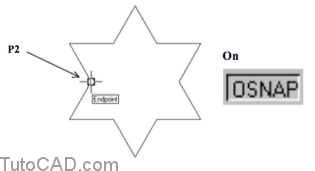
6- Press the F3 function key a few times and observe the OSNAP status bar button toggling On and Off. With the OSNAP status bar button On hold your crosshairs over the point P2 again and wait for the marker & tooltip to appear. Do NOT press your mouse button yet.
7- Keep pressing the <tab> key to observe the running osnaps cycle as illustrated below. Do not press your mouse button.
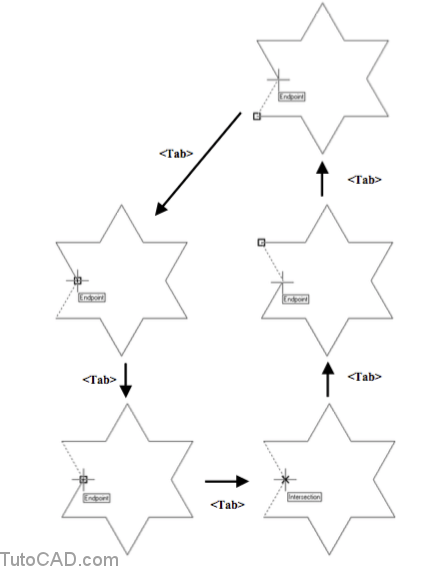
AutoCAD cycles through possible osnap candidates when you repeatedly press your <tab> key like this.
- running osnaps are assessed on nearby (highlighted) objects and the corresponding osnap marker & tooltip are displayed.
- you can left-click to use the point at the osnap marker that is currently displayed.8- Press <tab> until the tooltip and marker looks like the illustration below and left-click to use that point.
- Draw the remaining LINEs shown below on your own. When you get back to the starting point you can press <enter> to complete the command.

10- Save the changes to this drawing and Close the file.
You were able to complete these five LINEs with less effort using running osnaps compared to using osnap overrides.
There are times when having running osnaps set can interfere with your work or make it difficult to specify the desired points.
- you may even specify the wrong points if you forget about your running onsaps, which can be confusing.
- you can occasionally toggle them off (press F3 or left-click on OSNAP) to have more freedom when you pick points.