How to use selection Cycling
It is not always possible to place your pickbox over only one object (the one you want to select) when objects are close together.
- if you left-click with your pickbox over more than one object AutoCAD normally selects the youngest object
- but this might not be the object that you actually want to select.
- use the selection cycling feature for more control over which object you select with the pickbox if objects are close together.
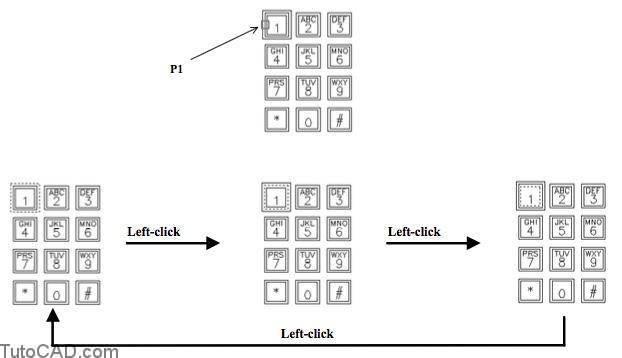
For example, suppose you wanted to select the large outer rectangle (shown below around button number 1) to use in an Array.
- when you are prompted to select an object, press & hold the <Ctrl> key while you left-click near P1 with your pickbox.
- release the <Ctrl> key & then repeatedly left-click to highlight different objects (cycle) that were under the original pickbox.
- you can left-click anywhere in the drawing area.
- when the desired object is highlighted you can press <enter> or right-click in the drawing area to select that object.
PRACTICE WITH SELECTION CYCLING
1) Close the drawing from the previous exercise if it is open.
2) Open the T201_2.dwg drawing file in your personal folder.
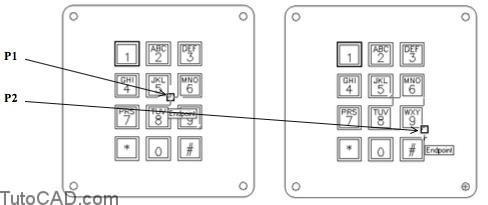
3) Pick Draw + Rectangle. Left-click on the OSNAP status bar button to turn it On (if it is Off). Then use Endpoint osnaps near P1 and P2 (opposite corners of the outer rectangle for button number 1) as the corner points for the new rectangle.
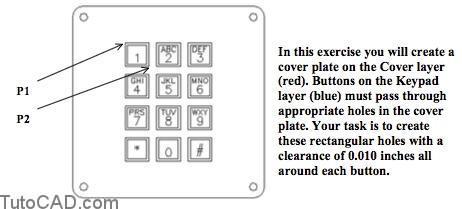
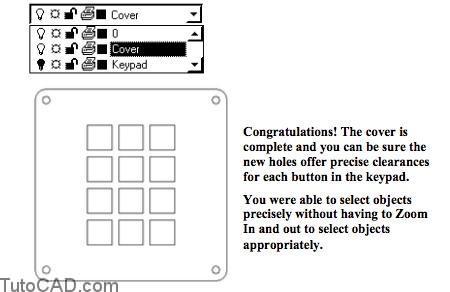
You just created a red rectangle (on the current Cover layer) that is directly on top of the outer blue rectangle (on the Keypad layer).
- in the next step you will useOffsetto make a new rectangle thatis 0.010 inches larger (all around) than the original red rectangle.
4) Pick Modify + Offset. Type 0.010 as the offset distance. When prompted to select an object to offset, press & hold the <Ctrl> key & left-click when your pickbox is above the new red rectangle near P3.
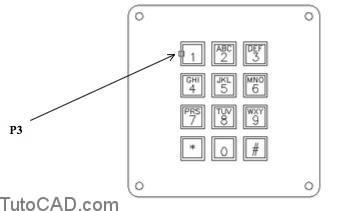
The red rectangle is probably selected now because this was the youngest object under the pickbox.
- this is the object that you want to select so you do not really need the selection cycling feature in this step
- but the next step will demonstrate how this feature works.
5) Release your <Ctrl> key then left-click anywhere in the drawing area a few times and notice how each time you click a different object is selected. When the red rectangle is highlighted, press the <enter> key or right-click in the drawing area to use this object. Pick any point outside this rectangle as the side to offset. Then press <enter> to terminate the Offset command.
6) Pick Modify + Erase. Press & hold the <Ctrl> key while you hold your crosshairs over the red rectangles near P1 and left-click. Release the <Ctrl> key then left-click in the drawing area a few times to highlight the different rectangles. When the smaller red rectangle is highlighted, press the <enter> key or right-click in the drawing area to select that rectangle. Then press <enter> to Erase this rectangle.
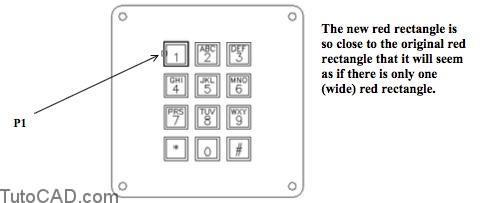
You wanted to keep the youngest object but it would have been selected for Erase if you did not use the selection cycling feature.
- you were able to select the desired rectangle without having toZoom In close enough to select it (alone) with your pickbox.
Now you are ready to make an Array of the large red rectangle to match the rows & columns of the existing blue buttons.
- this entire exercise is possible without even having to know the size of the blue buttons or the spaces between these buttons.
7) Pick Modify + Array. Enter L to select the Last (youngest) object and press <enter> to continue. Enter R to use aRectangular array. Type 4 as the number of Rows and type 3 as the number of Columns.
8) You will be prompted for the distance between rows and columns. Make sure the OSNAP status bar button is On. Invoke an Endpoint osnap near P1 (outer corner of button5) and left-click. Then invoke another Endpoint osnap near P2 (outer corner of button 9) and left-click. This shows AutoCAD the spaces in both rows & columns in one step instead of having to type the required distances separately.
» 9) Turn the Keypad layer Off.
» 10) Save the changes to your drawing and Close the file.