Working with External Files with autolisp in AutoCAD
We are not restricted to the AutoCAD drawing as the only place to store and retrieve information. AutoLISP provides the capability to use external files.
In order to use a file you must first open it, giving it a symbol name and designating whether it is to be read from, written to, or appended. After use, the file must be closed.
Explanation: the (open) and (close) functions
(setq file_symbol (open filename mode))
(close file_symbol)
The file_symbol is any symbol name you want to use to name the file. It is required so that you can close the file.
The modes are defined: “w” for writing, “r” for reading, or “a” for appending to an existing file. The mode argument must be lower case and in quotes.
- The (open) function returns a reference handle or “file descriptor” which is of a special data type called a file.
Command: (setq FILE (open “text.txt” “w”))
#<file “text.txt”>
Command: (type FILE)
FILE
Command: (close FILE)
Nil
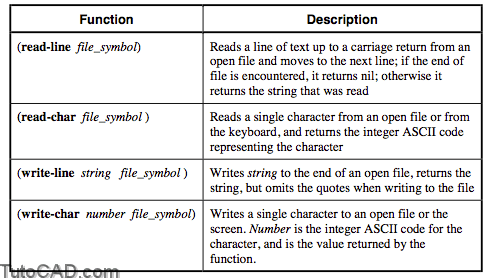
Reading and Writing ASCII Text Files
The most common use of external files is to read and write string data.
Explanation: Read and Write functions
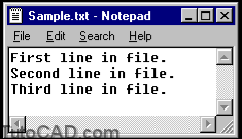
Example
(setq FILE1 (open “SAMPLE.TXT” “w”))
(write-line “First line in file.” FILE1)
(write-line “Second line in file.” FILE1)
(write-line “Third line in file.” FILE1)
(close FILE1)
(setq FILE2 (open “SAMPLE.TXT” “r”))
(setq L1 (read-line FILE2))
(setq L2 (read-line FILE2))
(setq L3 (read-line FILE2))
(setq L4 (read-line FILE2))
(close FILE2)
PRACTICE
Create a generic routine that will put a text file into an AutoCAD drawing. Estimated time for completion: 10 minutes.
1. Create a file called READ.LSP that has the following contents:
(defun C:READ ()
(setq CE-SAVE (getvar “cmdecho”))
(setvar “cmdecho” 0)
(while (= (setq FILENAME (getstring “\nFile to read: “)) “”)
(prompt “\nA file name must be entered…”)
)
(setq FILE (open FILENAME “r”))
(setq PT1 (getpoint “\nStarting Point: “))
(setq HT (getdist PT1 “\nHeight: “))
(setq SPACE (* HT 1.667))
(while (setq TEXTLINE (read-line FILE))
(command “TEXT” pt1 ht “0” TEXTLINE)
(setq PT1 (list (car PT1) (- (cadr PT1) SPACE)))
)
(close FILE)
(setvar “cmdecho” CE-SAVE)
(princ)
)
2.Use READ.LSP to write the file NOTES.TXT to a drawing.
- A complete solution to this exercise is on your class disk as READ-A.LSP.
Additional Practice
Edit BOM.LSP to write the lines to a file called “dwgname.bom”. You can then use the file to with the (read) function we created on the previous page to bring it into a drawing.
(defun c:BOM ()
(setq BLK-INFO (tblnext “BLOCK” T))
;;;Get the drawing name and then remove the extension from it.
(setq NAME (getvar “dwgname”))
(setq NAME (substr NAME 1 (- (strlen NAME) 4)))
;;;Open the file and give it the extension .bom
(setq FILE (open (strcat NAME “.bom”) “w”))
;;;Enter information on screen
(prompt “\n NUMBER \t\tNAME”)
(prompt “\n——————–“)
(while BLK-INFO
(setq BLK-NM (cdr (assoc 2 BLK-INFO)))
(setq SS1 (ssget “X”
(list (cons 0 “INSERT”)
(cons 2 BLK-NM)
)
)
)
(if SS1
(setq COUNT (sslength SS1))
(setq COUNT 0)
)
(prompt (strcat “\n \t” (itoa COUNT) “\t \t” BLK-NM))
;;; write information to file
(write-line (strcat (itoa COUNT) ” ” BLK-NM) FILE)
(setq BLK-INFO (tblnext “BLOCK”))
)
(close FILE)
(princ) )
- A complete solution to this exercise is on your class disk as BOM-B.LSP.
Printing Information to Files
Another way to add information to a file is to use the (prxxx) commands with a file name. These functions that can print not only strings but also other expressions to the command window and send the output to a file.
Explanation: the (prxxx) functions

Example
Typed in Visual LISP editor and loaded to the console:
(setq FILE (open “test.txt” “w”))
(princ (+ 5 7) FILE)
(princ (list 3.0 2.0 0.0) FILE)
(princ “\nThis is a string \twith a tab using princ” file)
(print “\nThis is a string \twith a tab using print” file)
(prin1 “\nThis is a string \twith a tab using prin1” file)
(close FILE)
Returns in the Visual LISP console window:
#<file “test.txt”>
12
(3.0 2.0 0.0)
“\nThis is a string \twith a tab using princ”
“\nThis is a string \twith a tab using print”
“\nThis is a string \twith a tab using prin1”
nil
Shows in the file test.txt:
12(3.0 2.0 0.0)
This is astring with a tab using princ
“\nThis is a string \twith a tab using print” “\nThis is a string…
…\twith a tab using prin1″ (not on a new line)
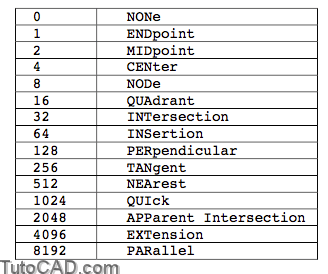
Object Snap Modes
In our practice we will be using an object snap. The OSMODE system variable uses the following numbers to specify the running object snaps. To include more than one object snap mode you would add them together.
- Remember it is always good practice to store existing settings at the beginning of your program and then reset them at the end.
(setq OSNAP-SAVE (getvar “osmode”))
(setvar “osmode” (+ 1 2 4 16 32))
… run program
(setvar “osmode” OSNAP-SAVE)
Practice
Open the drawing file POINTS.DWG. Create an AutoLISP routine that will go to the drawing and ask the user to select points in the drawing. (Turn on the Node object snap.) As each point is selected, write it to a file. Then, read the information from that file and put it back in the drawing as a list of points.
(defun c:points (/ FILE POINT FILEREAD PT1 HT SPACE)
;;;Setup the environment
(setq CE-SAVE (getvar “cmdecho”))
(setvar “cmdecho” 0)
(setq OSNAP-SAVE (getvar “osmode”))
(setvar “osmode” 8)
;;;Open file, write points to it and close it (setq FILE (open “Pointlist.txt” “w”))
(while (setq POINT (getpoint “\nPick a point: “))
(print POINT FILE)
)
(close FILE)
;;;Reopen file and print out information to the drawing
(setq FILEREAD (open “Pointlist.txt” “r”))
(setq PT1 (getpoint “\nStarting Point for text: “))
(setq HT (getdist PT1 “\nText height: “))
(setq SPACE (* HT 1.667))
(while (setq LINE (read-line FILEREAD))
(command “text” PT1 HT “0” LINE)
(setq PT1 (list (car PT1) (- (cadr PT1) SPACE)))
)
(close FILEREAD)
;;;Reset environment and exit quietly
(setvar “osmode” OSNAP-SAVE)
(setvar “cmdecho” CE-SAVE)
(princ)
)
- If you have time, clean up the prompts so that users do not have to type in a text height every time but can use the previous one.
- A complete solution to this exercise is on your class disk as POINTS-A.LSP