Clipping Xrefs
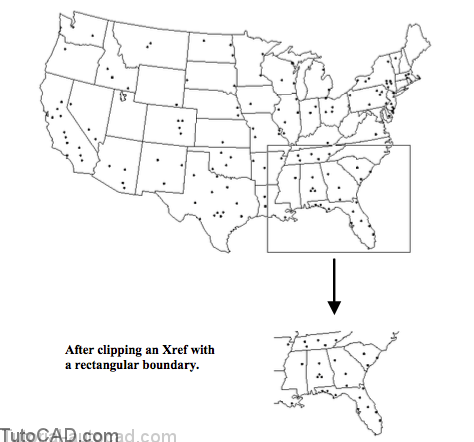
Xclip lets you clip (crop) an Xref using a specified boundary.
- only Xref geometry inside the boundary is displayed.
- the same feature can also be used on standard block inserts.
- optional top and bottom clipping planes (parallel to the 2D boundary region) define a 3D clipping volume in space.
You can trace an irregular boundary, pick corner points for a rectangular window or use an existing polyline of any shape.
Using clipped Xrefs with demand loading can also improve system performance when Xref drawings are very large.
- AutoCAD only has to load objects within the clipped region.
When you invoke Xclip you are first prompted to select an Xref (or a standard block insert) and you can select more than one.
Use the <New boundary> option to clip an Xref for the first time.
- pick 2 corner points at the first prompt for rectangular shapes
- or use the Polygonal option to trace out an irregular shape (with a similar technique as for the WPolygon selection tool)
- or use the Select Polyline option to select an existing LWPOLYLINE object for the clipping boundary.
Command: XCLIP↵
Select objects: (pick one or more XREFS)
Select objects: ↵
Enter clipping option
[ON/OFF/Clipdepth/Delete/generate Polyline/New boundary] <New>: ↵Specify clipping boundary:
[Select polyline/Polygonal/Rectangular] <Rectangular>: (etc..)
The ON & OFF options turn the effects of clipping on or off for the selected Xrefs (that have already been clipped).
- clipping boundaries are retained when they are off so when you turn them on again and the same clipped areas are displayed.
Clipdepth lets you control 2 optional clipping planes in 3D space (above and below the plane that your 2D clipping boundary lies on).
Delete purges the clipping boundary for the selected Xref(s).
generate Polyline makes a LWPOLYLINE object to match the
clipping boundary of the selected Xref(s).
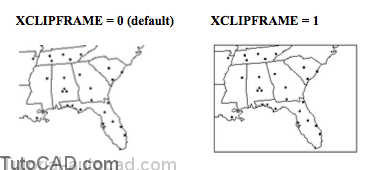
Clipping boundaries are NOT displayed by default
- but you can change the XCLIPFRAME system variable from the default of 0 to 1 to display this invisible boundary.
PRACTICE CLIPPING XREFS
1) Close all open drawings from the previous exercise.
»2) Pick File + New and select Start from scratch. Use English default settings and pick OK.
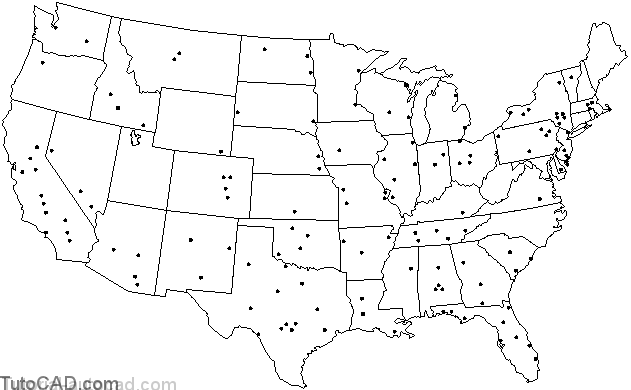
»3) Pick Insert + External Reference. Select T202_16.dwg in your personal folder and pick Open to continue. Uncheck all Specify On-screen boxes and pick OK.
»4) Pick View + Zoom + Extents to see the entire map that you just referenced into this drawing.
»5) Pick Modify + Clip + Xref. Follow the dialogue below to clip this map as shown.
Command: XCLIP↵
Select objects: (pickanypartofthemap)
Select objects: ↵
Enter clipping option
[ON/OFF/Clipdepth/Delete/generate Polyline/New boundary] <New>: ↵Specify clipping boundary:
[Select polyline/Polygonal/Rectangular] <Rectangular>: ↵
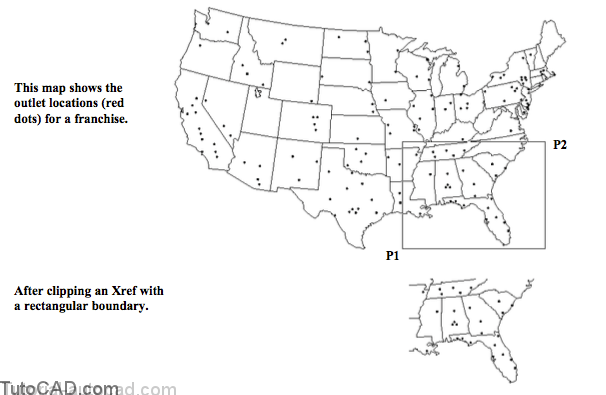
Specify first corner: (pick near P1)
Specify opposite corner: (pick near P2)
Command:
6) Pick Modify + Object + External Reference + Frame to toggle the XCLIPFRAME from 0 to 1.
7) Pick Modify + Object + External Reference + Frame again to toggle the XCLIPFRAME from 1 back to 0.

The boundary you see when XCLIPFRAME=1 is NOT an object but you can generate a LWPOLYLINE to match this boundary.
» 8) Pick Modify + Clip + Xref. Follow the dialogue below to generate a polyline to match the boundary.
Command: XCLIP↵
Select objects: (pickanypartofthemap)
Select objects: ↵
Enter clipping option
[ON/OFF/Clipdepth/Delete/generate Polyline/New boundary] <New>: P↵
Command:

This time the boundary you see is really a LWPOLYLINE object that you can manipulate independently of the Xref.
- XCLIPFRAME is 0 (off).
9) Enter E to invoke Erase and enter L to select the Last object (the LWPOLYLINE). Press <enter> to complete Erase.
10) Pick Modify + Clip + Xref. Follow the dialogue below to turn clipping Off for this Xref.
Command: XCLIP↵
Select objects: (pickanypartofthemap)
Select objects: ↵
Enter clipping option
[ON/OFF/Clipdepth/Delete/generate Polyline/New boundary] <New>: OFF↵
Command:
11) Invoke Xclip again and this time use the On option to turn xref clipping back on again.
Command: XCLIP↵
Select objects: (pickanypartofthemap)
Select objects: ↵
Enter clipping option
[ON/OFF/Clipdepth/Delete/generate Polyline/New boundary] <New>: ON ↵
Command:

12) Invoke Xclip again but this time use the Delete option to delete the clipping boundary.
Command: XCLIP↵
Select objects: (pickanypartofthemap)
Select objects: ↵
Enter clipping option
[ON/OFF/Clipdepth/Delete/generate Polyline/New boundary] <New>: D↵
Command:
13) Invoke Xclip again and follow the dialogue below to trace an irregular boundary shown.
Command: XCLIP↵
Select objects: (pickanypointonthemap)
Select objects: ↵
Enter clipping option
[ON/OFF/Clipdepth/Delete/generate Polyline/New boundary] <New>: ↵
Specify clipping boundary:
[Select polyline/Polygonal/Rectangular] <Rectangular>: P↵
Specify first point: (pick point on boundary)
Specify next point or [Undo]: (pick next point on boundary)
…
Specify next point or [Undo]: (keep picking points)
Specify next point or [Undo]: ↵
Command:

You can trace out any irregular shape for the boundary.
14) Invoke Xclip and use the Delete option again to delete the current clipping boundary for this Xref.
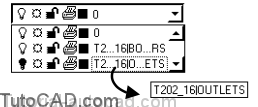
15) Turn Off the T202_16|OUTLETS layer so the objects on this layer are not considered as islands in the next step.
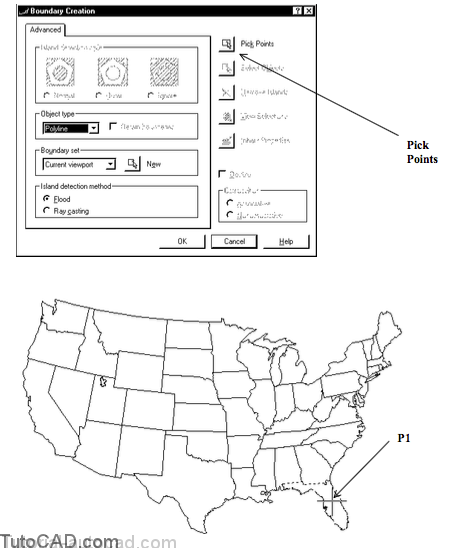
16) Pick Draw + Boundary. Pick the Pick Points button and pick a point inside the state of Florida near P1. You may have to Zoom In closer to find a valid boundary. Press <enter> to return and pick OK to create a LWPOLYLINE.
17) Pick Modify + Clip + Xref. Then follow the dialogue below to clip this Xref to the Florida state border.
Command: XCLIP↵
Select objects: (pickanypartofthemap)
Select objects: ↵
Enter clipping option
[ON/OFF/Clipdepth/Delete/generate Polyline/New boundary] <New>: ↵Specify clipping boundary:
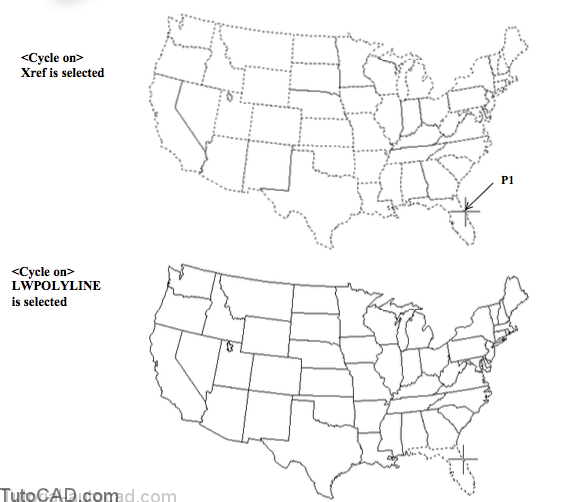
[Select polyline/Polygonal/Rectangular] <Rectangular>: S↵
Select polyline: (press & hold <Ctrl> & left-click near P1) <Cycle on> (left-clickuntilthestateofFloridaishighlightedthenpress<enter>)<Cycle off>
Command:
The LWPOLYLINE you created in the previous step is difficult to select without selecting the Xref.
- you used the object selection cycling feature to select the new LWPOLYLINE for the clipping boundary.
18) Turn the T202_16|OUTLETS layer back On.
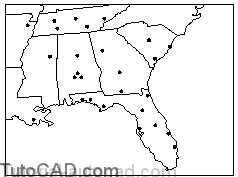
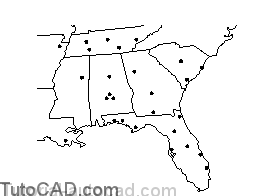
» 19) Pick View + Zoom + Window to zoom in for a closer look at the clipped Xref.

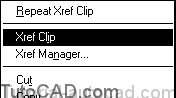
The clipping of Xrefs is similar to the clipping of viewports in Layouts. You can also select an Xref when no command is running andright-click in the drawing area to invoke a shortcut
- then select Xref Clip to invoke the Xclip command.
- or you could select Xref Manager to invoke the Xref command.
20) Close the current drawing without saving it.