How to use hatch Properties
Free lesson how to use hatch Properties in AutoCAD
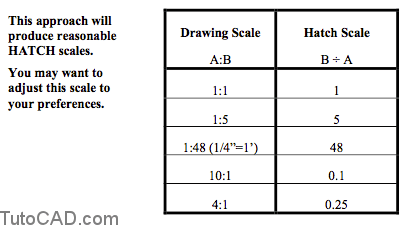
Scale
HATCH objects are created in the Model so you must take the drawing scale into account when you specify a hatch scale.
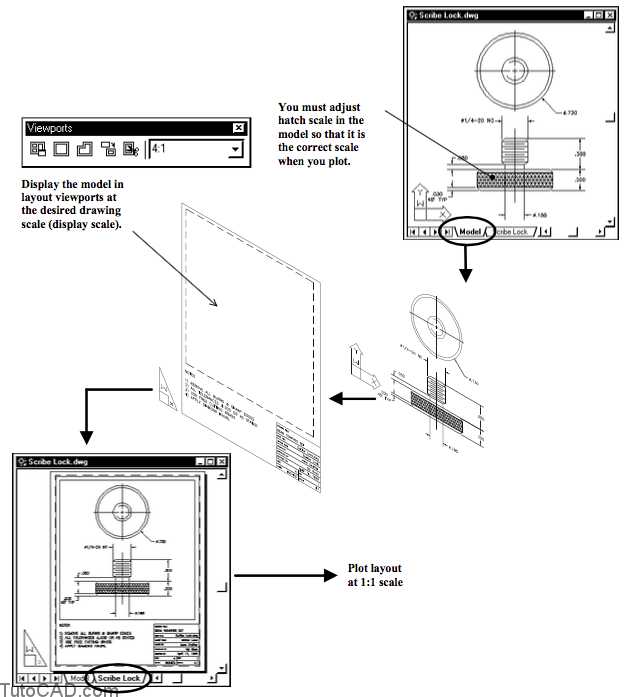
If the drawing scale is 1:1 then a hatch scale of 1 should create HATCH objects at a reasonable scale for drawings in inches or mm.
- enlarge the model when you Plot (e.g. 4:1 drawing scale) and you must reduce the hatch scale proportionately (e.g. 0.25).
- reduce the model when you Plot (e.g. 1:10) and you must increase the hatch scale proportionately (e.g. 10).
The table below demonstrates how you can adjust hatch scale for a variety of different drawing scales.
- if you express drawing scale as A:B then hatch scale is B ÷ A.
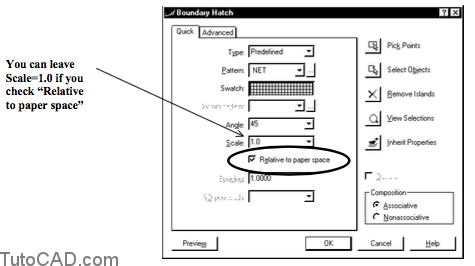
When you create new HATCH objects in a viewport on a layout (it should say MODEL in the status bar)
- you can check Relative to paper space and leave the Scale set to 1.0 for all drawing scales.
- then AutoCAD automatically adjusts hatch scale using the same approach as for the examples in the table above.
Drawing Units And Predefined Pattern Files
If you are working in a drawing created in inches (English Defaults) the MEASUREMENT system variable should be 0.
- then AutoCAD will use the file called Acad.pat for predefined hatch patterns.
- hatch patterns will be scaled appropriately for drawings created in inches with a hatch scale of 1 at 1:1 drawing scales.
If you are working in a drawing created in mm (Metric Defaults) the MEASUREMENT system variable should be 1.
- then AutoCAD will use the file called Acadiso.pat for predefined hatch patterns.
- these hatch patterns will be scaled appropriately for drawings created in mm with a hatch scale of 1 at 1:1 drawing scales.
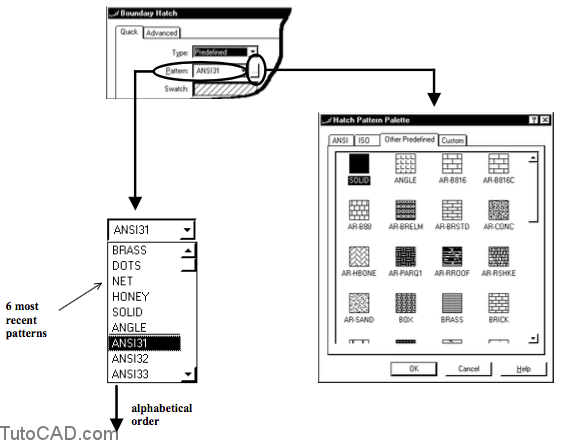
You can select a predefined pattern in two different ways.
- select a pattern from a drop-down list in alphabetical order (the 6 previously used patterns are listed at the top).
- click on the swatch or the
 button (next to the drop-down list)
to select an icon from the Hatch Pattern Palette.
button (next to the drop-down list)
to select an icon from the Hatch Pattern Palette.
Hatch Angle
The swatch displays hatch patterns in the orientation that you would get if you use a hatch angle of zero.
- you can use the same pattern with different angles to differentiate your hatching.
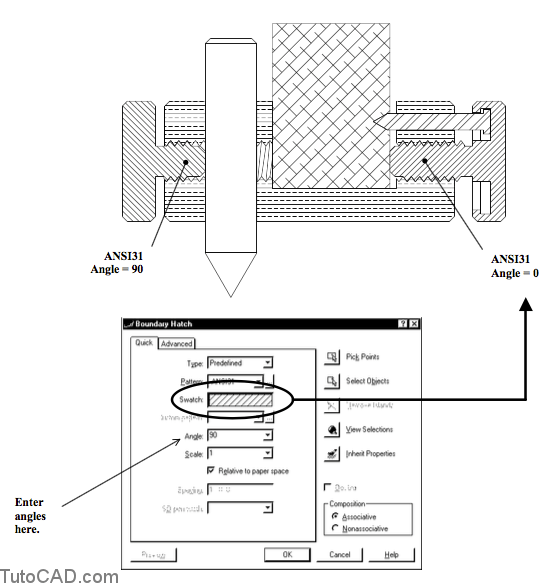
The swatch does NOT change orientation when you enter a different value for the hatch angle.
- you must actually create a HATCH object (or Preview it) to see what the hatching orientation will be for the specified angle.
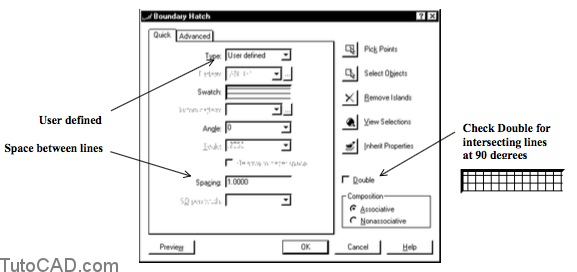
There are alternatives to predefined hatch patterns.
- if Type is User defined you can create simple hatching (like ANSI31) but specify the space between lines (instead of scale).
When Type is Custom you can select custom hatch patterns that are defined in any custom PAT file.
- you must add the desired custom PAT file to your AutoCAD search path.
- for more information use AutoCAD Help and search for Quick tab (Boundary Hatch dialog box)
You can create your own hatch patterns in ASCII PAT files.
- for more information use AutoCAD Help and search for hatch patterns, constructing.
- code for the standard ANSI31 hatch pattern stored in the Acad.pat file is shown below.
*ANSI31, ANSI Iron, Brick, Stone masonry 45, 0,0, 0,.125
-code for the standard ANSI31 hatch pattern stored in the Acadiso.pat file is shown below (note that 0.125 * 25.4 = 3.175)
*ANSI31,ANSI Iron, Brick, Stone masonry 45, 0, 0, 0, 3.175
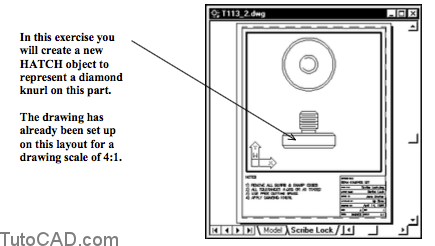
Practice setting AutoCAD hatch properties tutorial
- Close the drawing from the previous exercise if it is open.
- Open the T113_2.dwg drawing in your personal folder.
3- Pick Draw + Hatch. Left-click on the swatch to invoke the Hatch Pattern Palette. Select Other Predefined & scroll down the list to find NET3 and select this icon. Then pick OK to return to the Boundary Hatch dialogue box.
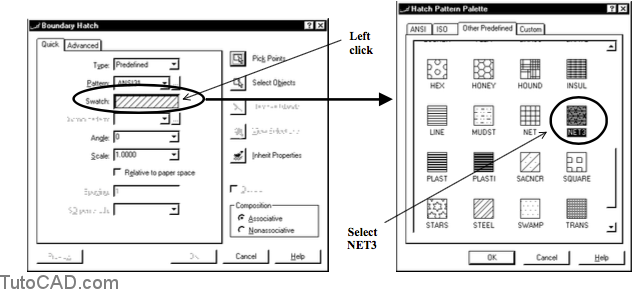
You could have selected the same hatch pattern by name from the drop-down list but using the icon lets you see the hatch pattern.
4- Check Relative to paper space. Make sure the Scale is 1.0000. Then pick the Pick Points button and pick a point near P1 as the internal point and press <enter> to return to the dialogue box. Pick OK to create the HATCH.
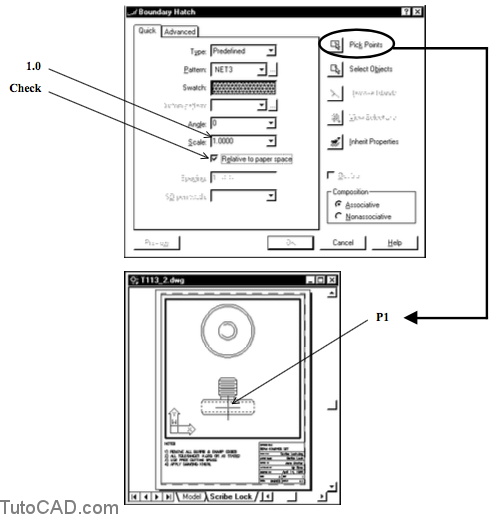
If you had been on the Model tab instead, you would have had to compensate for the drawing scale in the hatch scale.
– the drawing scale is 4:1 in this drawing so you would have had to specify 0.25 as the hatch scale.
It is easier to make a HATCH in a viewport on a layout because scale can always be 1 with Relative to paper space checked.
– the drawing scale is not important as long as the viewport display magnification has been set for the proper drawing scale.
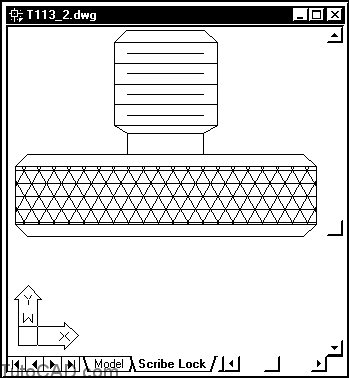
5- Zoom In for a closer view of the new HATCH.
More practice?
6- Erase the HATCH object.
7- Select the Model tab to switch to the Model.
8- Create the same HATCH object but use a Scale 0.25.

9- Save the changes to this drawing and Close the file.