Using AutoCAD DesignCenter Effectively
AutoCAD DesignCenter is a tool to find, access and re-use content that is not already stored in an open drawing.
- obvious content types include drawings & block definitions
- but content can have many other forms (including content created by custom applications).
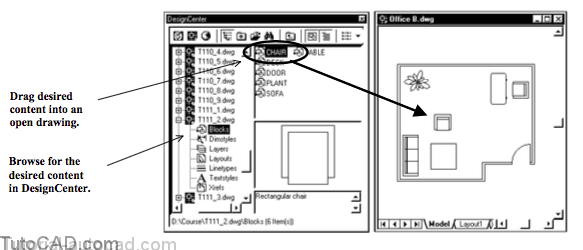
Selected content can be dragged into an open drawing without having to open the drawing file where this data is stored.
- for example, you could preview selected block definitions stored in any closed (or open) drawing file.
- then you could drag selected block definitions stored in any closed (or open) drawing file into an open drawing.
- if you want to insert a block with parameters other than the defaults (e.g. scale) double-click on the block to invoke Insert.
- You can use DesignCenter as an alternative to the Insert dialogue box for inserting blocks defined in the active drawing.
If you must insert blocks precisely you should double-click on the block definition or drag & drop with your right mouse button.
- the insertion point for block inserts is approximate (by eye) when you drag & drop using your left mouse button.
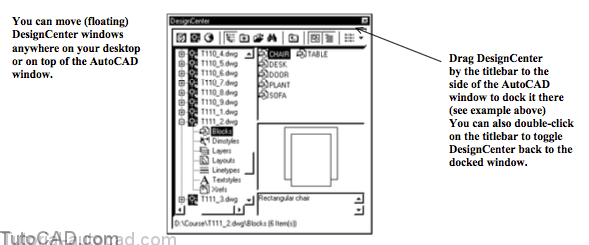
AutoCAD DesignCenter can be docked on the side of your AutoCAD window like a toolbar.
- drag DesignCenter by the titlebar to the side of your AutoCAD window to dock it there.

You can also float the AutoCAD DesignCenter window.
- drag the grab bars of a docked AutoCAD DesignCenter and drop it away from an AutoCAD window edge.
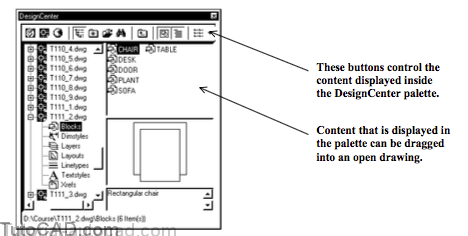
Content must be displayed in the AutoCAD DesignCenter palette before you can drag that content into an open drawing file.
- you can navigate DesignCenter using some of the same techniques that you use to navigate Windows Explorer.
The most direct way to display desired content in the palette is to use the Load button in DesignCenter.
- the Load dialogue box is like using the Open command in AutoCAD to open a drawing file.
- using Load does NOT Open selected drawings in AutoCAD (it simply displays the content of that drawing in the palette).
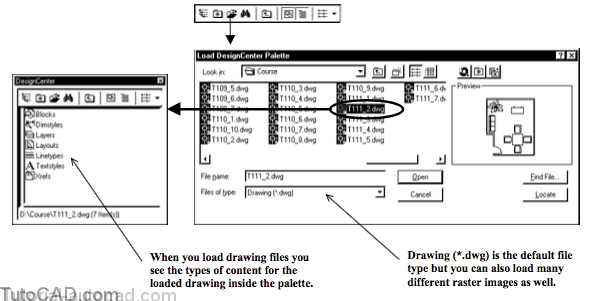
When you load a drawing into the DesignCenter palette you see the list of content for that drawing.
- you can double-click on content that is displayed in the palette to move down in the hierarchy of the content displayed there.
- for example, double-click on Blocks to display all block definitions that are defined in the loaded drawing.
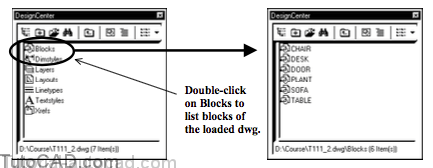
- Use the Up button to move up in the content hierarchy.
![]()
- for example, move Up from the list of content in a drawing to see other drawings in the same folder as the loaded drawing.
- move another level Up from there to see the folder that the loaded drawing is stored in, etc..
![]()

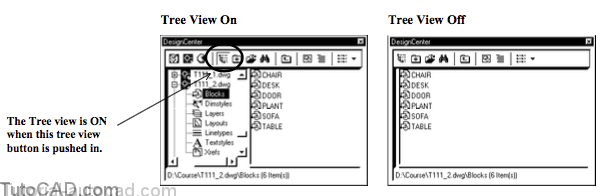
Select the Tree view toggle button to split DesignCenter into two separate sections.
![]()
- the tree view is displayed on the left side and the palette is displayed on the right when this button is pushed in.
- only the palette is displayed when this button is NOT pushed in.
You can navigate in the tree view like in Windows Explorer.
- click on the or boxes to expand & collapse sections of the tree view (e.g. to list content for a specific drawing).
Drawing files include content types underneath when expanded (like sub-folders under other folders in Windows Explorer).
- select Blocks under a drawing in tree view to see the blocks defined in the palette for that drawing.
- select Layers under a drawing in tree view to see the layers defined in the palette for that drawing, etc..
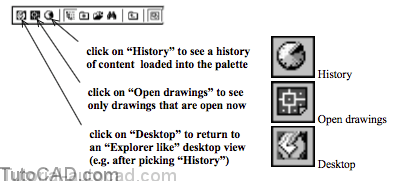
Three more buttons appear in DesignCenter to the left of the Tree view toggle button when the Tree View toggle is pushed in.
It is practical to work with the Tree view toggle pushed in.
- you can quickly locate the desired content using the same navigation techniques as for Windows Explorer.
For example, you could browse your network and expand the drawing file of interest on the tree view side to expose content.
- then you could select Blocks on the tree view side under the desired drawing to see defined blocks of that file in the palette.
- you can see a preview and description when you select a block definition in the palette.
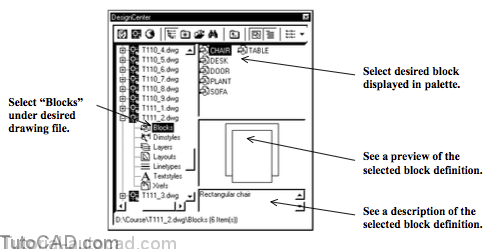
You must have the Preview and Description buttons pushed in to see previews & descriptions of selected block definitions.
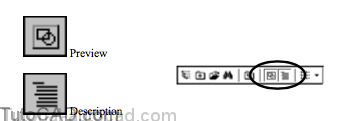
If a description was not entered for the block definition (in Block) then the description area will be blank in DesignCenter.
- blocks defined by versions prior to AutoCAD Release 14 (or AutoCAD LT 97) will have blank descriptions in DesignCenter.
- you can see block previews even if the drawings were created by earlier AutoCAD versions.
You can resize the preview & description areas of the DesignCenter palette by dragging the divisions between sections.
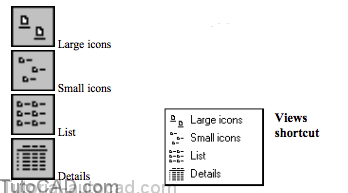
You can toggle content in the palette between four different display modes by left-clicking on the current DesignCenter Views button.
- or right-click on the current Views button to select the desired view mode from a shortcut menu
One of the most powerful DesignCenter features is the built-in Find tool to search for desired content.
![]()
- for example, you could search for all drawing files and blocks called “CHAIR”.
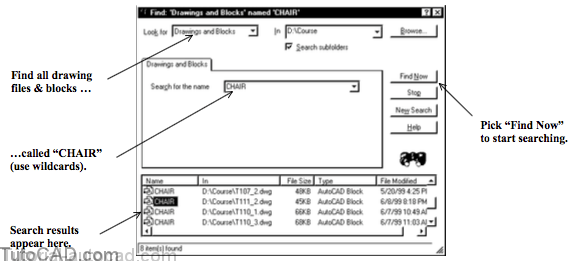
- right-click on one of the matches in the resulting list to invoke a shortcut menu and select Load into Palette.

When you select a drawing file in the palette (folder selected in tree view) you see a preview of the drawing in the palette preview area
- and file summary info will also appear in the description area if this information has been created for the selected drawing.
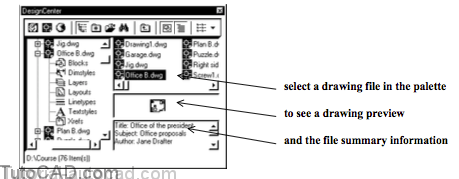
- You can create or modify summary information for the active drawing using the Dwgprops command in AutoCAD.
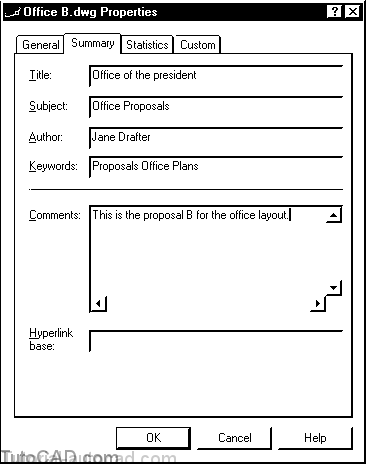
- Information that you attach to drawings using Dwgprops can be viewed from Windows Explorer (AutoCAD is not required).
- right-click on a drawing file from Explorer and select Properties from the shortcut to see this data (read-only).
- only General information is displayed in Explorer unless other data has been attached for the selected file using Dwgprops.
PRACTICE USING DESIGNCENTER
» 1) Close the drawing from the previous exercise if it is open.
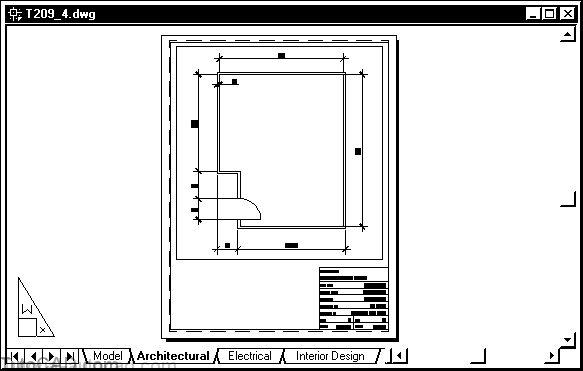
» 2)Open the T209_4.dwg drawing in your personal folder.
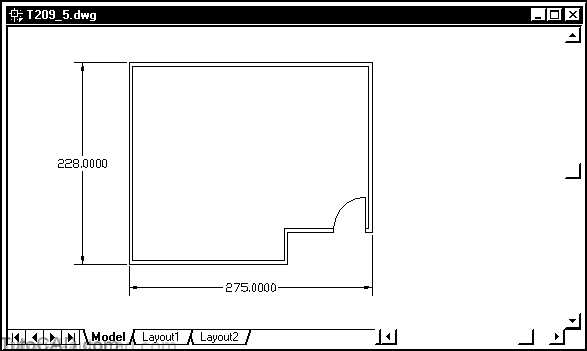
3) Open the T209_5.dwg file in your personal folder as well.
The first drawing is representative of a complete drawing.
- objects are placed on appropriate layers & dimension stylesare appropriate for this type of drawing.
- layouts have been prepared for plotting & title blocks use textstyles with more attractive fonts than the default txt.shx.
The second drawing is more of a sketch.
- there are no special layers, text styles or dimension styles and preparations have not been made for plotting.
- you will use DesignCenter to improve the second drawing.
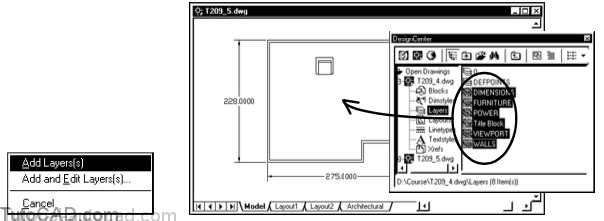
4) Pick Tools + AutoCAD DesignCenter (if this utility is not already open). Select the Tree View button and then select Open Drawings button. No other buttons should be selected and the Views should be Large Icons. DesignCenter can be docked or floating (as shown in the illustrations).

5) Expand the T209_4.dwg drawing in the tree view on the left side of DesignCenter to reveal the types of content stored in this drawing. Then select Blocks under this file to display the blocks that are defined in this drawing in the palette on the right side of DesignCenter.
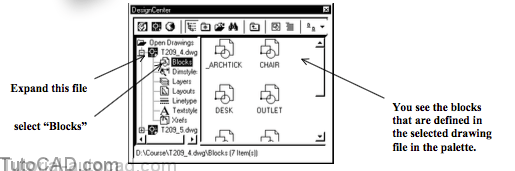
6) Select the CHAIR block in the palette and then select the Preview button. You may have to resize the divisions in the palette to see the preview better.
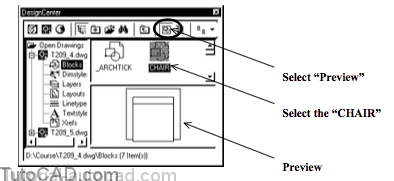
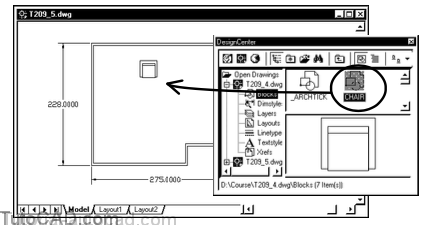
7) Use your left mouse button to drag & drop the CHAIR block from the DesignCenter palette into the T209_5.dwg drawing approximately as shown.
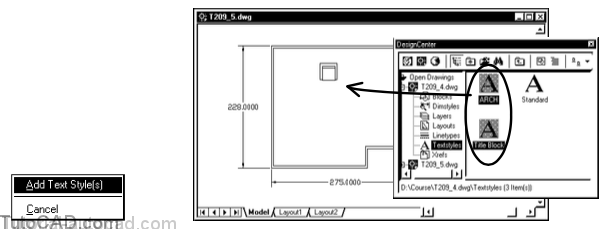
8) Select Textstyles in the Tree View & turn the Preview Off. Press & hold <shift> while you select the ARCH and Title Block styles in the palette. Use your right mouse button to drag & drop these text styles into the T209_5.dwg drawing and select Add Text Style(s) when you release your right mouse button.
When you use your left mouse button to drag & drop content from the palette you do NOT get the shortcut menu.
- this can make some tasks easier by minimizing the number of mouse picks required.
Using the right mouse button to drag & drop is more cautious as you can cancel the task if you change your mind
- you may also have more options in some cases.
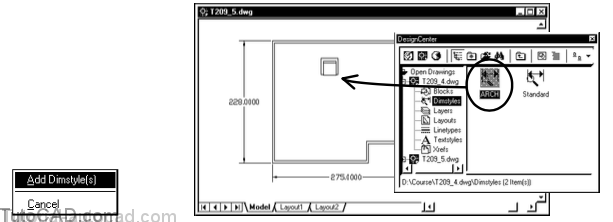
9) Select Dimstyles in the Tree View. Select the ARCH dimstyle in the palette with your right mouse button. Drag & drop this dimstyle into the T209_5.dwg drawing and select Add Dimstyle(s) when you release your right mouse button.
10) Select Layouts in the Tree View. Select the Architectural layout in the palette with your right mouse button. Drag & drop this layout into the T209_5.dwg drawing and select Add Layout(s) when you release your right mouse button.
You do not have to actually drag & drop selected content from the palette into a drawing window if that drawing is the active drawing.
- you can right-click on the selected content in the palette and pick the desired option from the shortcut menu instead.
- whereas, it may be more practical to drag & drop content if you have more than one drawing open at the same time.
11) Select Layers in the Tree View. Change the Views to List so you can see more layers. Select all layers except 0 & DEFPOINTS in the palette. Use your right mouse button to drag & drop the layers into the T209_5.dwg drawing and select Add Layer(s) when you release your mouse button.
12) Pick Tools + AutoCAD DesignCenter to dismiss this utility (if desired).
You have the required custom definitions from the T209_4.dwg to complete the T209_5.dwg file in a similar manner.
- you could now update the current drawing (T209_5.dwg) to use these imported definitions with relatively little effort.
More practice?
13) Select the 2 dimensions when no command is running then select DIMENSIONS layer in the layer drop-down list to move these objects to this layer. Press <esc> twice to clear the grips on these dimensions.

14) Use a similar technique to move the CHAIR block insert to FURNITURE & the other objects to the WALLS layer.
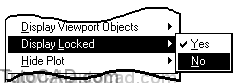
15) Select the Architectural layout that you imported into this drawing. Then select the viewport border and right-click in the drawing area to invoke a shortcut. & pick Display Locked + No to unlock the viewport display scale.
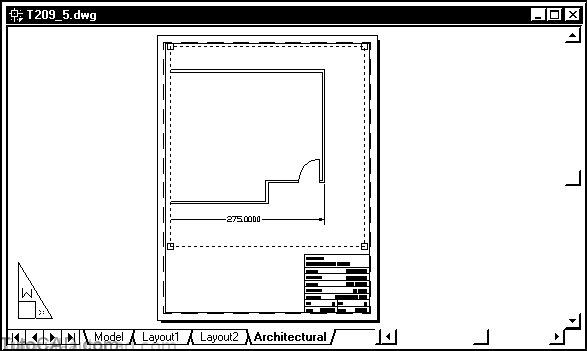
16) Double-click inside the viewport to switch to model space.
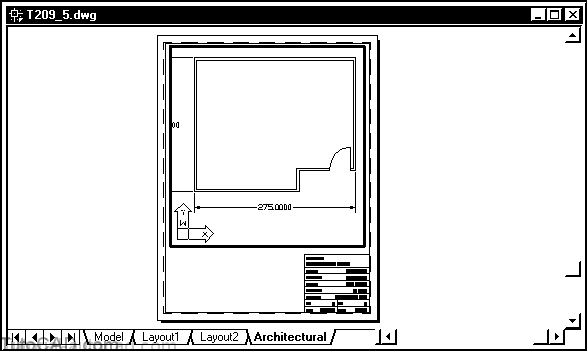
17) Enter P to invoke Pan and drag the view in the viewport sothat it appears as shown below & press <esc> to exit Pan.
When you use Pan in a viewport you do not change the drawing scale so this layout will still be set up for 1/4″ = 1 foot scale.
18) Right-click on any toolbar to invoke a shortcut and select Dimension if it is not already displayed.
19) Select ARCH as the current dimension style in the drop- down list. Pick the Dimension Update button & select the 2 dimensions then press <enter> to update them to the current style.

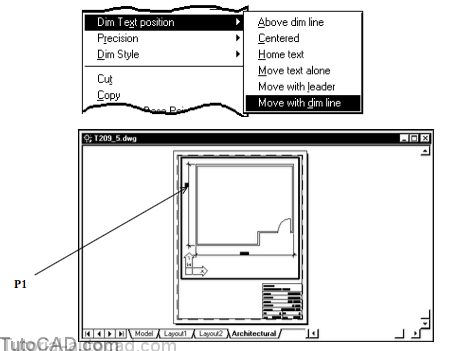
20) Select the vertical dimension (that does not quite fit inside the viewport) then right-click to invoke a shortcut. Pick Dim Text position + Move with dim line. Then pick a point near P1 to make the dimension visible inside the viewport.
21) Double-click outside the viewport to switch to paper space.
22) Select the viewport then right-click in the drawing area to invoke a shortcut. Pick Display Locked + Yes to lock this viewport scale again.
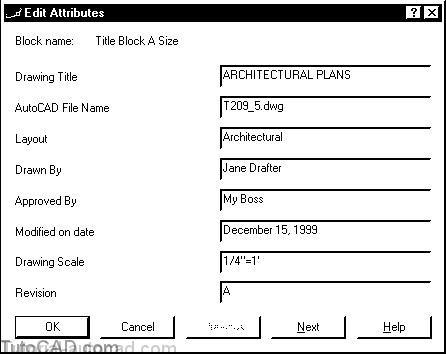
23) Pick Modify + Attribute + Single and select any part of the title block. Adjust the AutoCAD File Name, use the current date and use your name for Drawn By then pick OK.
24) Save changes to your completed drawing & Close the file.