Assigning Materials In Models 3D
Objects in the real world appear the way they do because of their surface material properties.
- you must understand how to work with materials to make your AutoCAD renderings appear more realistic
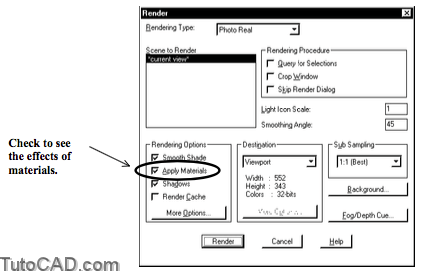
- and you must check Apply Materials when you Render to see the effects of materials assigned to surfaces in your model.
Default Material
Surfaces do not have material definitions assigned to them in new drawings created from scratch.
- surfaces are rendered using the default global material if there is no specific material assigned.
- the default rendered color is based on the AutoCAD Color Index (ACI) color of the AutoCAD object (usually set BYLAYER).
Materials Library
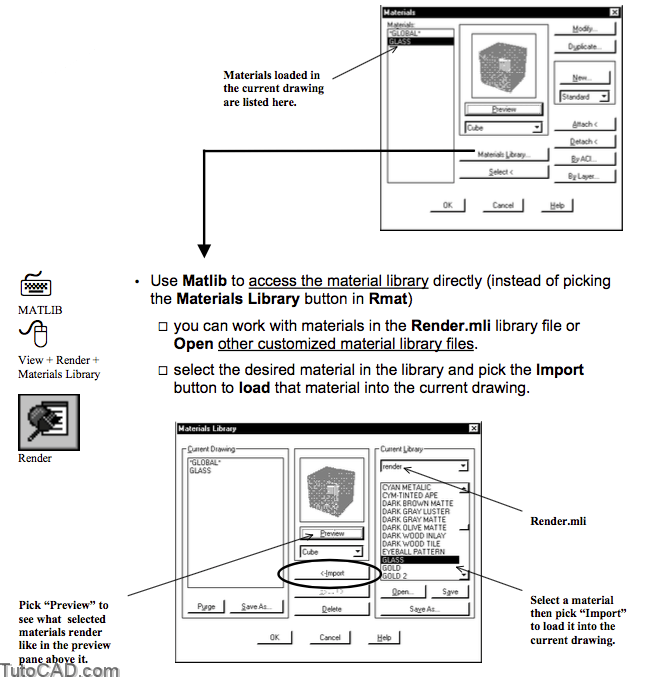
AutoCAD is supplied with a library of basic material definitions that you can import into drawings and assign to surfaces.
- standard material definitions are stored in the Render.mli file.
- you can use these material definitions or modify them (or even create your own from scratch) to create custom materials.
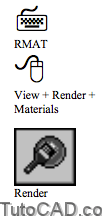
Use Rmat to assign material definitions that are loaded in the current drawing.
- you can also modify material definitions or access the material library to load more material definitions into the current drawing.
- materials can be Attached explicitly, assigned By ACI (object color in AutoCAD) or By Layer.
Texture Files
Material definitions can use external texture files (bitmap images such as *.tga files) for special effects.
- for example, you could simulate trees by applying materials (that use bitmap images of trees) onto simple flat surfaces.
- or you could use a bitmap image of the sky (cloud.tga) in the background behind a house model.
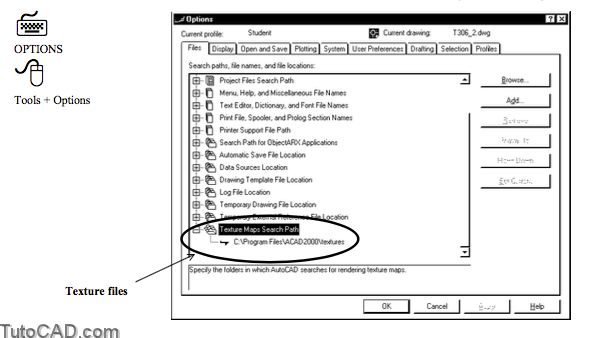
If you define a material that uses a texture file you can specify the complete path to where the texture file is stored.
- or use Options to specify default paths if materials do not include a path to required texture files.
- many of the standard material definitions use texture files and they are stored in the Textures sub-folder under AutoCAD.
- you can add other folders for textures if you wish but you must remember to archive this information with your drawing files.
If you create your own materials that use custom texture files you can store these texture files in the same folder as your drawings.
- do not include a path when you specify the texture file name so you can move all files to other folders (if you wish) later on.
- when you Render the model, AutoCAD looks (first) for the required texture files in the same folder as the drawing file.
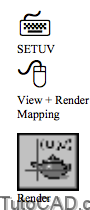
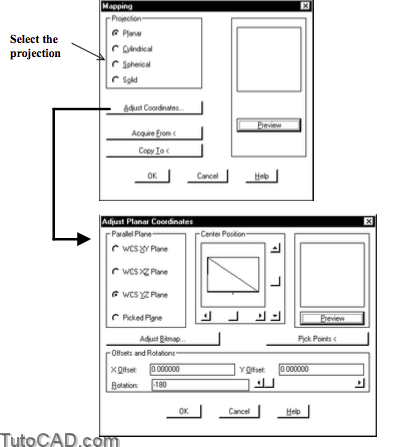
Use Setuv to control how bitmap image files are projected onto objects when materials use texture files.
- for example, you could create a custom material called PAINTING that uses mypainting.tga as the texture bitmap
- then assign the PAINTING material to a simple rectangular surface (e.g. REGION) on a wall in a 3D model
- then use Setuv to set projection as Planar and adjust coordinates to project mypainting.tga onto the REGION object.
Mapping techniques are worthy of an entire course alone and these details are beyond the scope of this document.
- however, you will have an opportunity to map a painting bitmap image onto a simple rectangular surface in the next exercise.
PRACTICE WORKING WITH MATERIALS
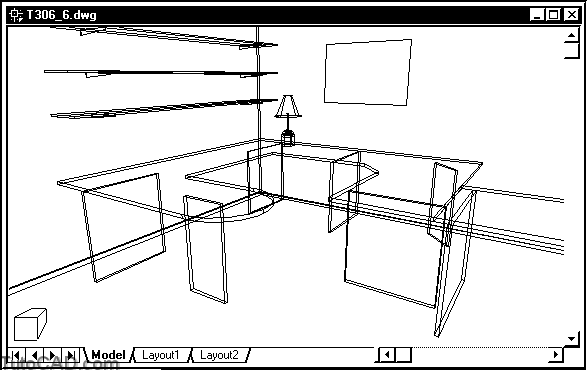
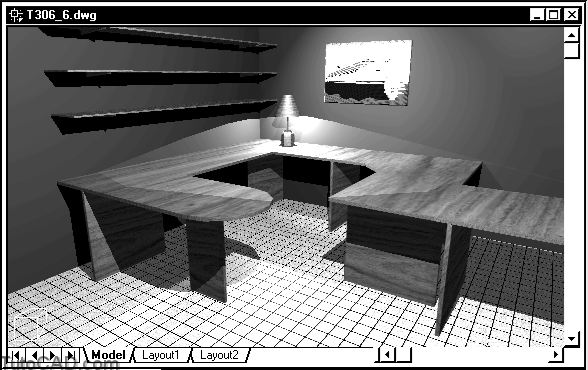
» 1) Continue with your office drawing (or Open the T306_6.dwg in your personal folder if you did not do previous exercises)
2) Pick View + 3D Orbit. Right-click in the drawing area to invoke a shortcut. Pick More then Adjust Distance and drag your cursor upwards to move closer to the desk. Press <Esc> to continue.
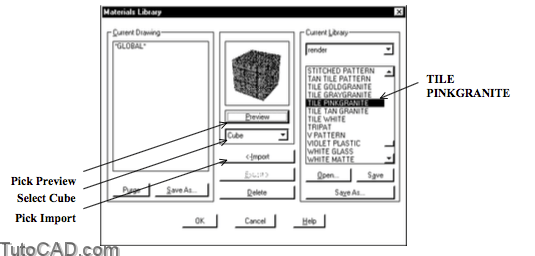
3) Pick View + Render + Materials. Then pick the Materials Library button to continue.
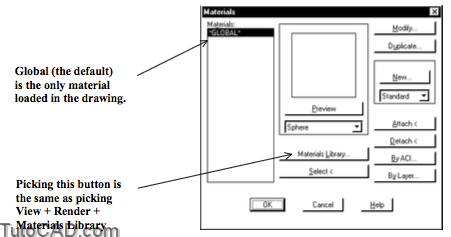
In the next step you will load two predefined materials into the current drawing so you can assign them to surfaces in the model.
4) Scroll down the list and select TILE PINKGRANITE as the material. Select Cube as the shape for the preview and pick the Preview button. Then pick the Import button to load this material into the current drawing.
5) Scroll down the list and select WOOD – TEAK as the material and pick the Import button to load this material in to the current drawing. Then pick the OK button to return to the Materials dialogue box.
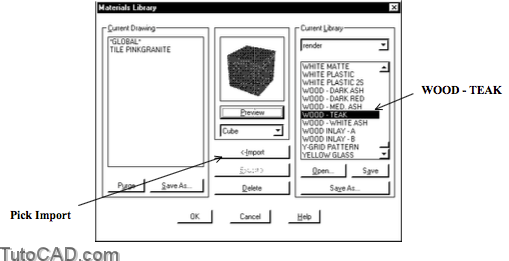
When you return to the Materials dialogue box you will see these two new materials in the materials list.
6) Select the TILE PINKGRANITE material and pick the By Layer button. Select the Floor layer. Then pick the Attach button to assign this material to that layer & pick OK.
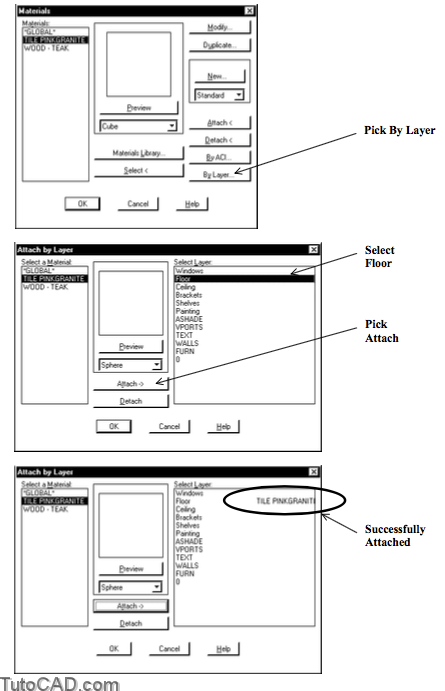
When you pick the Attach button you see the TILE PINKGRANITE material listed beside the Floor layer name.
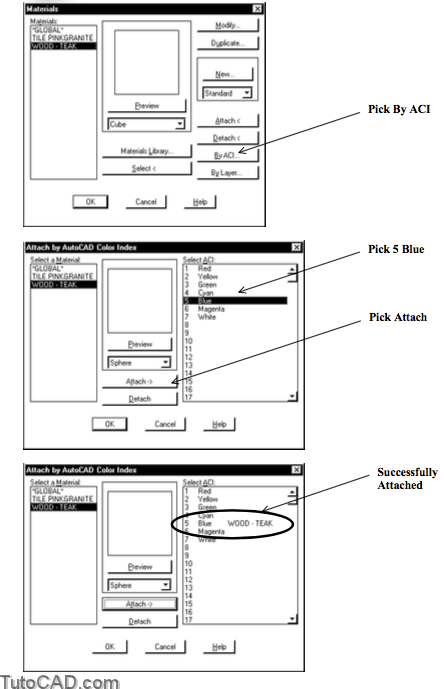
7) Select WOOD – TEAK as the material then pick the By ACI button. Select the color 5 Blue then pick the Attach button to assign this material to all objects that are blue on-screen. Pick OK to return and OK again to terminate Rmat.
8) Pick View + Render + Render. Select current view as the Scene to render. Then pick the Render button to render the image using the parameters shown below.
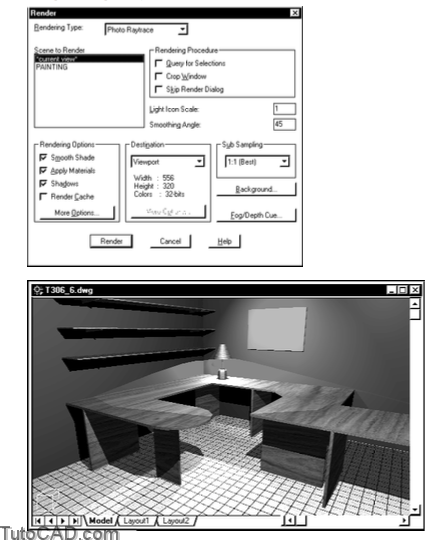
The floor is rendered with the TILE PINKGRANITE material because this material is assigned to the Floor layer.
- every object that was Blue in AutoCAD now uses WOOD – TEAK as the material.
Objects that are not assigned one of these materials are rendered using the global material & they keep their own (ACI) object color.
- for example, the walls are Red in AutoCAD and they also appear Red in this rendered image.
9) Pick Format + Layer. Left-click on the color Red for the Walls layer to invoke the Select Color dialogue box. Select 152 (or type this number in the edit box) as the color and pick OK to return and pick OK again to terminate Layer.
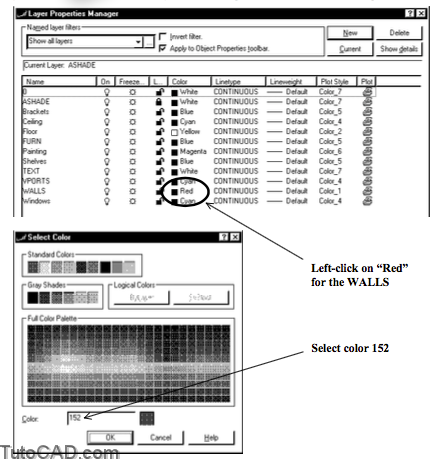
10) Pick View + Render + Render then pick the Render button again and see how the walls now are rendered using various shades of the 152 ACI color.
You do not have to assign materials to all surfaces in your models.
- for example, in this model it is easy to paint the walls by simply assigning another color to the Walls layer.
- this can be easier than changing material definitions to achieve similar results.
More practice?
» 11) Pick View + Redraw to clear the rendering from your screen.
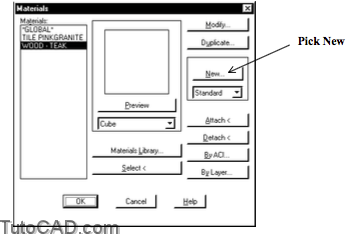
» 12) Pick View + Render + Materials. Pick the New button there to begin creating a new material from scratch.
13) Type PAINTING as the Material Name. Pick the Find File and select T306_painting.bmp in your personal folder as the bitmap to use then pick Open to return to the New Standard Material box. Pick Adjust Bitmap to continue.
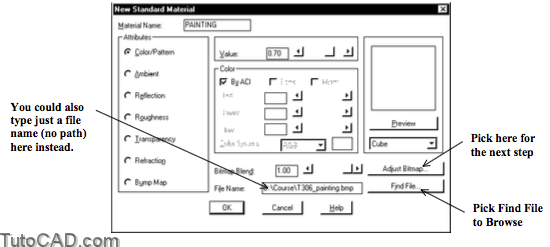
The T306_painting.bmp is a simple image file of a ship.
- you are creating a new material that can be applied to a rectangular surface on the wall to simulate a painting.
- you could type the bitmap name if you did not want to force AutoCAD to look in your personal folder for this file.
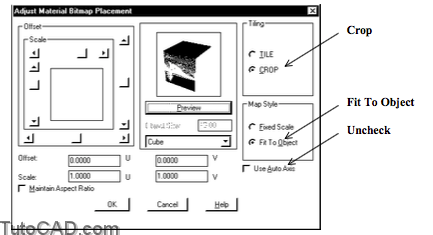
14) Change Tiling to Crop. Pick Fit to Object for the Map Style. Uncheck Use Auto Axis. Pick OK to return to the previous box & OK again to return to the Materials dialogue box.
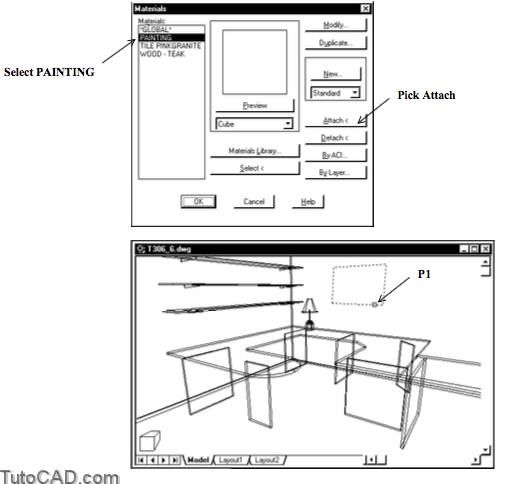
15) Select PAINTING and pick the Attach button. Select the rectangle near P1. Press <enter> to return & pick OK.
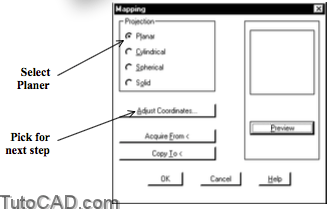
16) Pick View + Render + Mapping. Select the rectangle that you attached the PAINTING material to & press <enter>. Planar should be already selected for the Projection type. Pick the Adjust Coordinates button to continue.
17) Select WCS YZ Plane as the Parallel Plane (this plane is parallel to the wall). Then pick OK to return to the previous box and pick OK again to terminate Setuv.
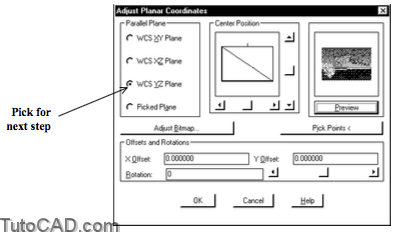
The PAINTING material is assigned to the rectangular REGION
- and you have specifically mapped the bitmap used in this material to a plane parallel to the YZ plane of the WCS.
- you could select Picked Plane instead if you have to select a plane that is not parallel to one of the planes listed.
- now you can Render the view again to see the painting projected onto the REGION.
18) Pick View + Render + Render. Pick the Render button to see the effects of this new PAINTING material.
19) Save the changes to the current drawing.
Still more practice?
20) Continue with the house drawing (or Open T306_7.dwg inyour personal folder if you did not do previous exercises).
21) Import the standard materials indicated below and assign them to the surfaces by layer as indicated. Then Render the current view.
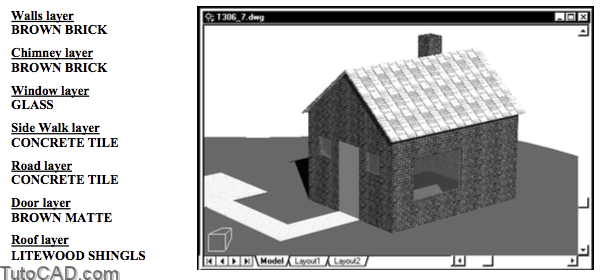
22) Save the changes to the current drawing.