Creating & Using Layouts In Templates
You should customize your template drawing files to include the most common page setups as layouts.
- you can have a different layout for each sheet size you use.
- then the desired sheet is readily available when you start New drawings From a Template.
![]()
You do not need these layouts in ALL of your template drawings.
- you can create a few template drawing files specifically forlayouts and set up each layout as desired.
To use a layout from your template you can right-click on the current layout tab to invoke a shortcut & select From template.
- then select one or more layouts from your template file to use in the active drawing.

You should Insert your customized title block drawings into the customized layouts & set them up in your template drawing files.
- create ATTRIBUTE definitions in a title block drawing for the variable text (like the “Drawing Title”).
- when you Insert the drawing into a layout as a block insert you will be able to modify all variable text in the Attedit dialogue box.
- this data can then be exported (e.g. into spread sheets) or used to conduct searches using the DesignCenter Find tool.

Define ATTRIBUTE definitions (like TEXT objects) using Attdef.
- you can define default values and prompts to use when youInsert the defined block.
- if ATTDIA is 1 (initial value stored in registry is 0) you can specify attribute values in a dialogue box when you Insert the block.
Edit ATTRIBUTE values in inserted blocks using Attedit.
- you can change all attribute values from one dialogue box.
PRACTICE SAVING AND USING LAYOUTS IN TEMPLATES
1) Continue from the last exercise.
2) Pick File + Open and change the Files of type back to Drawing (*.dwg) and select T206_2.dwg in your personal folder. Then pick the Open button there.
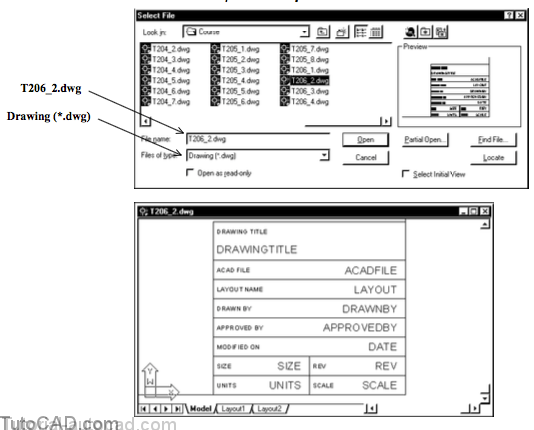
This is a very simple title block drawing for an A size (8.5”x11”) sheet with all objects created on layer zero.
- the small text in this title block will always be the same in every layout so these objects are created as TEXT.
- the large text has already been created (using Attdef) as ATTRIBUTE definitions.
- these ATTRIBUTE definitions will be used for variable text (text that is different in each layout).
3) Make My template for layouts.dwt the active drawing.

4) Type ATTDIA at the command line and make sure this system variable is set to 1 (so you can use a dialogue box to specify attribute values when you Insert blocks that have attribute definitions).
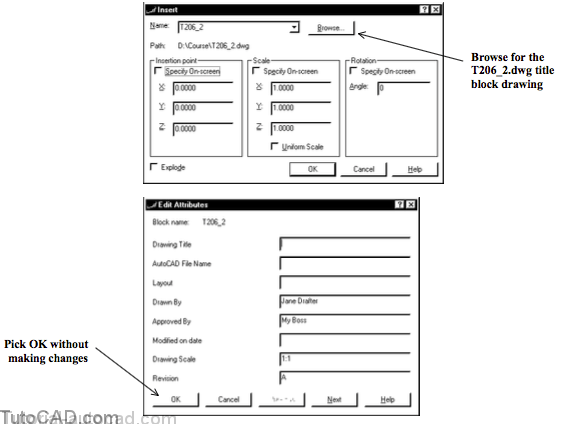
5) Pick Insert + Block and pick the Browse button. Select the T206_2.dwg drawing in your personal folder and pick Open to return to the main dialogue box. Uncheck all Specify On-screen boxes and pick OK. Then pick OK to keep the default attribute values in the Edit Attributes dialogue box.
6) Right-click on the A-Size Portrait tab to invoke a shortcut and select Page Setup to continue.
7) Select Extents as the area to plot on the Layout Settings tab. Then check Center the plot then pick OK.
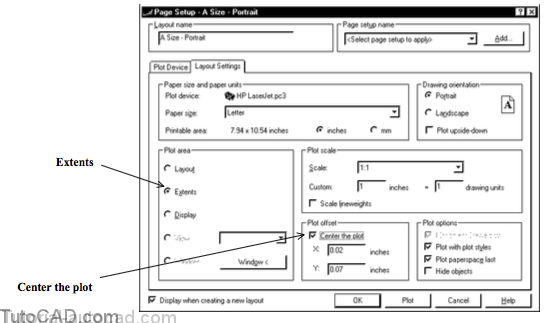
Now that you have the final title block object inserted in this layout you can select Extents as the area to plot.
- this lets you Center the plot (unavailable when Layout is selected) to make sure it fits in the printing area on this sheet.
8) Pick Format + Rename and select Blocks as the Named Objects. Then select the T206_2 block Name and type Title Block A Size in the Rename To box then pick the Rename to button and pick OK.

9) Pick File + Save to update changes to this template file.
» 10) Pick File + Close to close the template file.
» 11) Pick File + Close to close the T206_2.dwg title block drawing file (that you just inserted into the template file).
» 12) Pick File + Open and select the T206_1.dwg file in your personal folder then pick the Open button there.
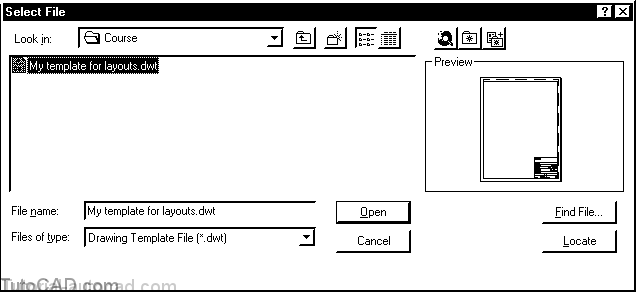
13) Right-click on the Model tab (not the MODEL status bar button) and select From Template from the shortcut.
14) Make sure the Look in location is your personal folder and select the My template for layouts.dwt template. Then pick the Open button there. Select the A Size – Portrait layout and pick OK to complete the task.
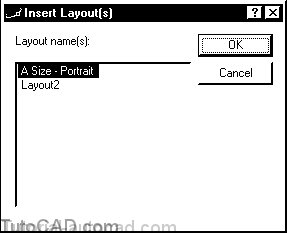
15) Select the A Size – Portrait tab to go to the layout that you just “imported” into the current drawing (from the template).
16) Select the title block insert when no command is running. Then select the Title Block layer in the Layer control drop down list on the Object Property toolbar to “move” this object onto this layer. Press <Esc> twice to clear the grips.
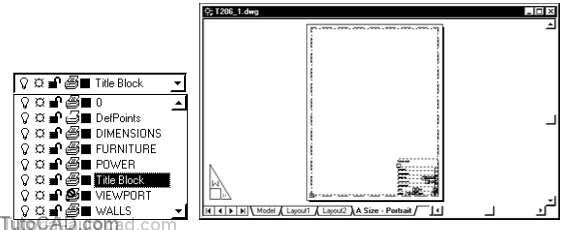
The title block is now on the Title Block layer in the active drawing.
- this layer was already defined in the active drawing before you imported the layout.
- this is the layer name used for title blocks in layouts of template drawings supplied with AutoCAD.
» 17) Pick File + Save to update your changes to the T206_1.dwg and prepare for the next exercise.