How to use Multiline MTEXT Objects
Free course how to use Multiline MTEXT Objects in AutoCAD

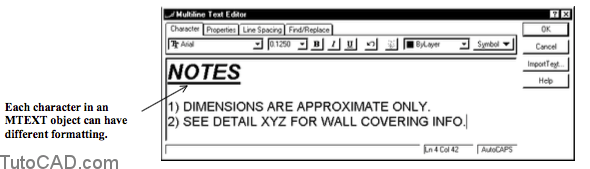
You can create entire paragraphs (multi lines) of text as a single MTEXT object and each character can be formatted separately.
- use the Mtext command to create MTEXT objects. Mtext lets you format characters individually using familiar Windows techniques in the Multiline Text Editor.
- select the desired text in the editor & select the desired format from the Character tab to change the selected characters. You can change settings for an entire MTEXT object from the Properties and Line Spacing tabs in this editor.
- use Find/Replace tab to find and replace characters in the MTEXT object that is currently loaded in the editor.
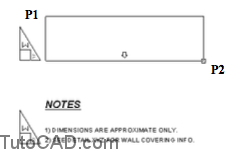
Pick two points to use the default Mtext options and define opposite corners for a bounding box of the new MTEXT object.
Command: MTEXT ↵
Current text style: “Layout Notes” Text height: 0.1250
Specify first corner: (P1)
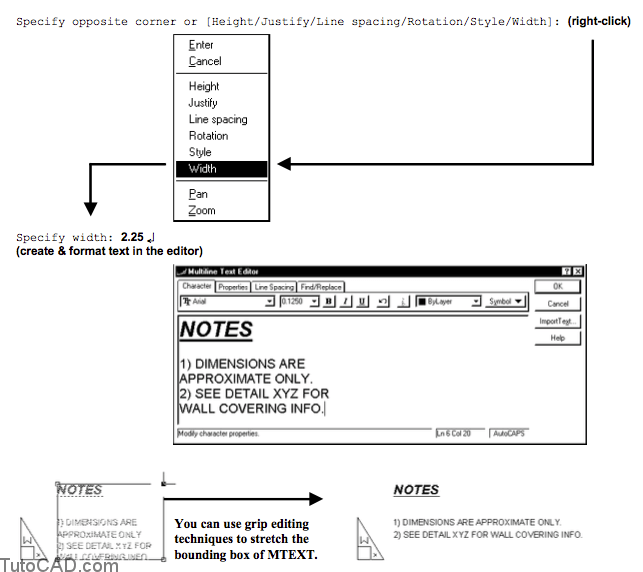
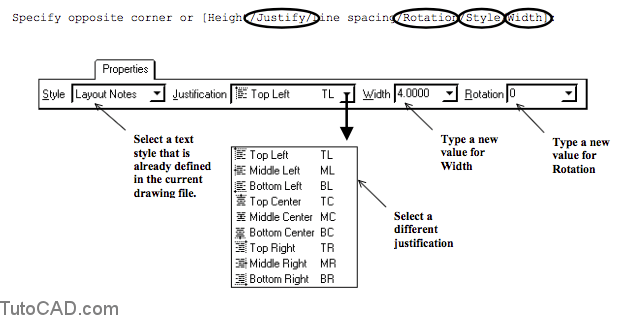
Specify opposite corner or [Height/Justify/Line spacing/Rotation/Style/Width]: (P2)
(create & format MTEXT in the editor)
The bounding box is displayed only while you are picking the two corners of this box or when you edit an MTEXT object with grips.
- characters are allowed to flow out of the bounding box as you type more lines for the current MTEXT object.
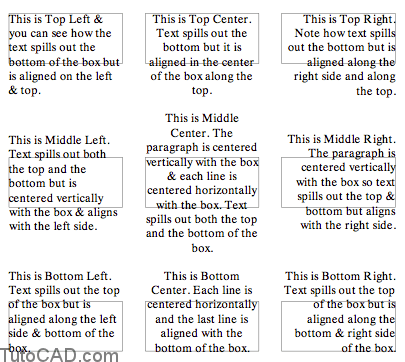
- justification determines how characters are aligned with this box & whether text flows out of the top or the bottom of the box.
You can right-click in the drawing area at the prompt for the opposite corner and select Justify from the shortcut.
- right-click again and select a two letter abbreviation for the desired justification in another shortcut.
- for example, BR is the abbreviation for Bottom Right.

Word Wrapping And Width
The Width of an MTEXT object determines how long a line of text can be before the next line begins automatically.
- width is calculated from the opposite corners of the bounding box (the horizontal distance) if you pick two corner points.
You can also pick one corner point & right-click in the drawing area to select Width from a shortcut instead of picking the other corner.
- use this approach when you know the required width or it is not convenient to pick another corner point to control the width.
- you can also use this approach to enter a value of zero for Width to explicitly turn word wrapping Off.
- when word wrapping is Off you must press the <enter> key to begin new lines (as new paragraphs) in the current MTEXT.
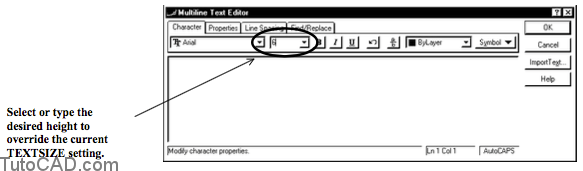
The default Height of MTEXT is controlled by the same TEXTSIZE system variable that sets the default TEXT height for Dtext.
- the current height is displayed on the command line when you invoke Mtext.
- right-click in the drawing area at the prompt for the opposite corner & select Height from the shortcut to change TEXTSIZE.

You can also change the value for height in the drop-down list of the Multiline Text Editor BEFORE you type any characters.
- this overrides the current default for text height without changing the TEXTSIZE system variable used in the next Mtext command.
- you can select a height in the drop-down list or you can type a value for the desired height there instead.
If you have already typed characters in the editor then these characters will not change when you change the text height value.
- you must select the desired characters that you have already typed & then specify the desired height in this drop-down list.
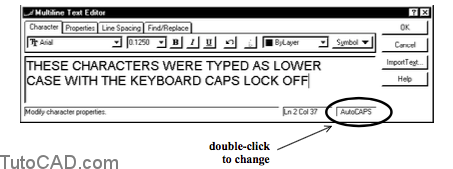
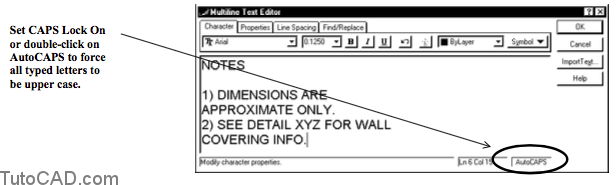
AutoCAPS
You can force characters typed in the Multiline Text Editor to always be UPPER CASE by turning on AutoCAPS
- double-click on the AutoCAPS pane to toggle this setting On or Off
- characters are UPPER CASE as you type regardless of the Caps Lock setting on your keyboard when AutoCAPS is On.
Style
The current text style is used for new MTEXT objects in the same way text styles are used in TEXT objects.
-
- the current style is displayed on the command line when you invoke Mtext.
- you can right-click in the drawing after picking the first corner point to invoke a shortcut and select Style.
- then you can type the name of the desired style (which also changes the current text style) to use for the new MTEXT object.

It is easier to use the Style command to set the current style before invoking Mtext because you can select the desired style from a list.
The default Line spacing is At Least 1x which creates new MTEXT lines below previous lines by a distance of 1.66 * text height.
- for example, when text height is 0.125, new lines would begin 1.66 * 0.125 = 0.208 below previous lines.
- additional space is added (if required) to accommodate the highest characters.
![]()
You can right-click in the drawing area after picking the first corner point for Mtext to select Line spacing from a shortcut.
- you must also specify what type of line spacing to use.
- use At least to allow for characters that are unusually large. (AutoCAD adds extra space as required).
- use Exactly to force line spacing to be the specified distance (e.g. to fit inside a grid) even for unusually large characters.
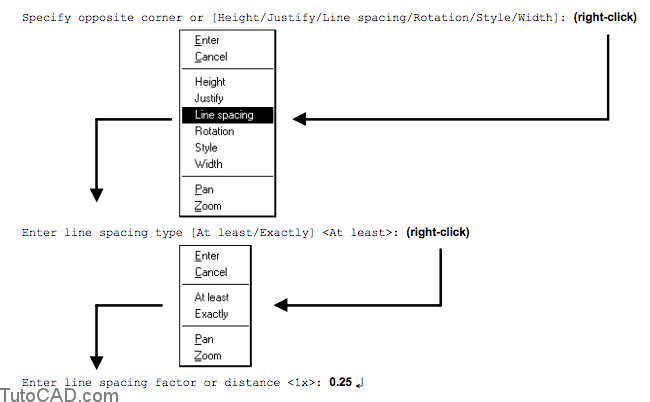
If you enter a line spacing factor followed by the character “x” (e.g. 1.5x) then the space is relative to the normal space between lines.
- if you enter a factor without typing the character “x” (e.g. 0.25) then this is the actual space between lines in drawing units.
The Mtext command and the Multiline Text Editor are packed with features but this section is an introduction to these powerful tools. - you can read the pages that follow in this section to learn more.
- each of the four tabs in the Multiline Text Editor are mapped and basic descriptions are given.
- you can also use AutoCAD Help to learn more on your own.
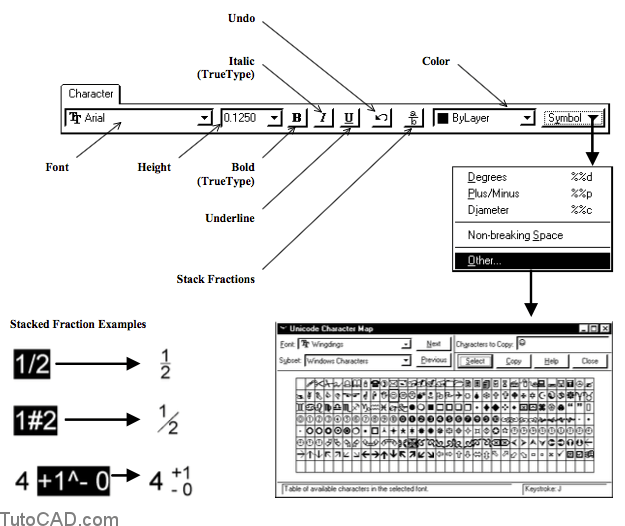
Use the Character tab to apply formatting to selected characters – apply font, height, color, bold (TrueType fonts only), italic (TrueType fonts only), underline or stack fractions
You can also use the Symbol button to insert special characters that do NOT appear on your keyboard (e.g. the degrees symbol).
You control the entire MTEXT object when you change settings on the Properties tab (not just selected characters).
– these settings can also be set by invoking the appropriate option on the command line before entering the Multiline Text Editor.
Line Spacing Tab
The Line Spacing tab lets you set the same parameters that you can specify on the command line using the Line spacing option.
Specify opposite corner or [Height/Justify/Line spacing/Rotation/Style/Width]: L ↵
Enter line spacing type [At least/Exactly] <At least>: (select type)
Enter line spacing factor or distance <1x>: (specify factor)

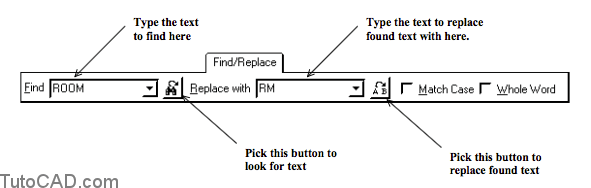
You can use the Find/Replace tab to automatically look for and replace (if desired) specific text in the current MTEXT object.
- -the Match Case and Whole Word options are similar to the corresponding settings in MS Word.
- -check Match Case to perform a case sensitive search (“Walls” would not find “WALLS”)
- -check Whole Word to find only matches that are entire words (“is” would not find “this”).
Shortcuts
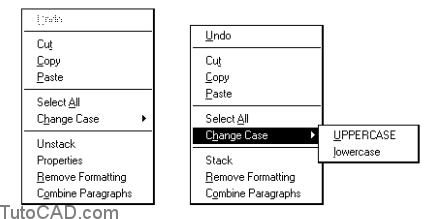
You can invoke shortcut menus in the Multiline Text Editor by selecting characters and then right-clicking in the editor.
- for example, use Change Case to make selected characters either UPPER CASE or lower case.
Shortcut options will depend on which characters you select.
- for example, Stack is available when selected characters include a special stacking character ( / or # or ^).
- Unstack and Properties (of stacked fractions) are available when you select a stacked fraction.
Free tutorial: using MTEXT in AutoCAD
- Close the drawing from the previous exercise if it is open.
- Open the T110_5.dwg drawing in your personal folder.
- Make sure the OSNAP status bar button is Off (left-click on it if it is On).
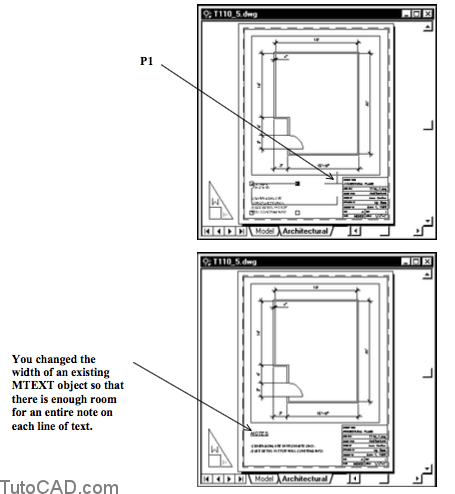
- Pick Draw + Text + Multiline Text. Then pick near P1 and P2 to specify the corners of bounding box by eye as shown.
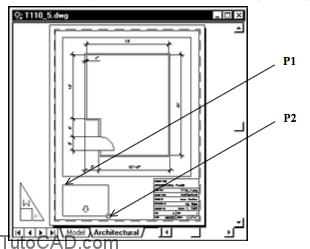
- Type the word NOTES and press <enter> to start a new line. Then press <enter> again to create a blank line. Type the first note shown and press <enter> only after typing the period at the end of the note (let word wrapping determine when to begin a new line). Then type the second note but do not leave the Multiline Text Editor (yet).
If you picked the bounding box as shown above, the width for this MTEXT object will not be wide enough for an entire note.
Scroll bars will appear as required if there is not enough room to display an entire MTEXT object in the editor.
– you can drag the edges of the Multiline Text Editor to enlarge this dialogue box.
6- Double-click on the word NOTES to select these characters. Pick the Bold, Italic and Underline buttons to turn these format options on for the selected characters. Type 0.2 as the new height and then pick OK.

Double-click on any character in a word to select the entire word. – tripple-click on any character in a paragraph to select an entire
paragraph (you begin new paragraphs when you press <enter>). – you can also left-click between any 2 characters and drag to select individual characters adjacent to those characters.
7- With no command running, left-click on the new MTEXT object to select it. The bounding box grips will appear.

8- Left-click on the upper right corner grip to make it hot and then pick a point to the right near P1 below to Stretch the bounding box. Then press <Esc> twice to clear the grips.
9- Right-click in the drawing area to invoke a shortcut and select Pan. Drag the view so the new MTEXT object is near the center of your screen. Then right-click in the drawing area again and select Zoom from the shortcut.
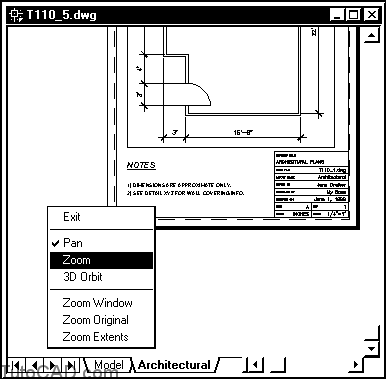
10- Drag your cursor upwards to Zoom in for a closer view of the new MTEXT. Press <Esc> to complete the command.
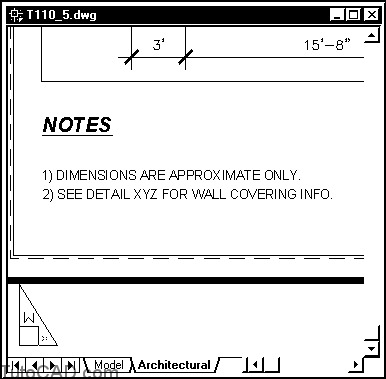
- You applied formatting to individual characters of this MTEXT object to make the word NOTES more obvious. - this is one object even though there are three lines of text.
- You made similar notes (on page 10) using Dtext but those notes
were created by three separate TEXT objects.
- -TEXT is more practical to use when there is only one line (e.g. room numbers in a floor plan)
- -MTEXT is more practical to use when there are several lines of related text or when you must format characters individually.
More practice?
11- Save the changes to this drawing and Close the file.
12- Open the T110_6.dwg drawing in your personal folder.
13- Rectangles have already been created in this drawing so you can use Endpoint osnaps to specify the corner points of the bounding boxes to create the MTEXT objects shown. You can use your own words for each object but use the justification described for each MTEXT. You can use the defaults for all other parameters.
14- Save the changes to this drawing and Close the file.